Irresistible Italian Cream Stuffed Cannoncini Recipe
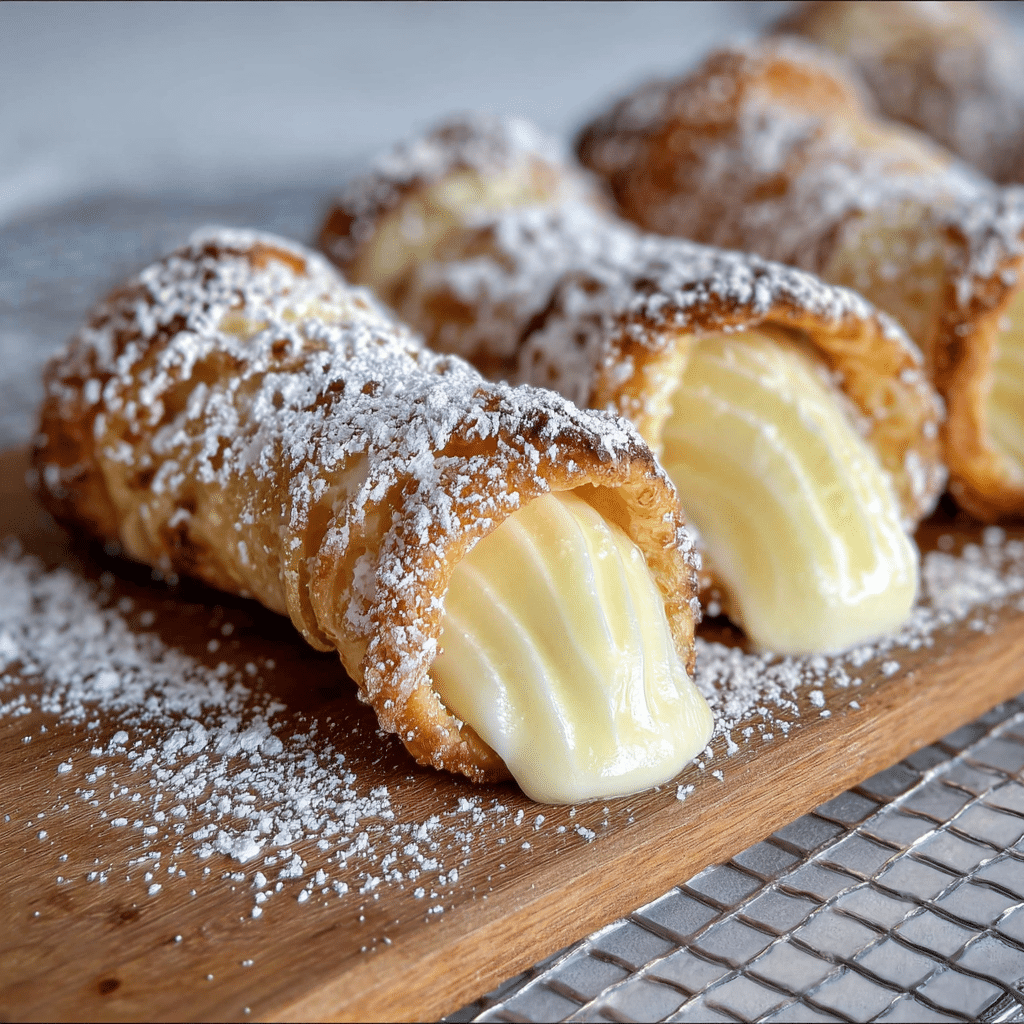
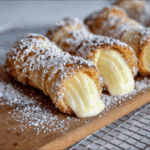
Discover the creamy delight of Italian Cream Stuffed Cannoncini, a perfect blend of sweet, rich, and irresistible flavors in every bite. This classic Italian pastry combines flaky, buttery cones filled with luscious cream that will enchant your taste buds and brighten any occasion. Whether you’re treating yourself or impressing guests, this recipe is your go-to for an authentic, show-stopping dessert experience.
Why You’ll Love This Recipe
- Irresistibly Creamy Filling: The luscious cream inside each cannoncino melts in your mouth, offering rich flavor and perfect texture.
- Perfectly Flaky Pastry: The delicate, golden cones provide a crisp contrast to the smooth filling for a satisfying bite every time.
- Simple Ingredients: Uses basic pantry essentials that are easy to find yet combine to deliver an authentic Italian treat.
- Great for Any Occasion: From casual family afternoons to celebratory dinners, this recipe shines no matter where it’s served.
- Customizable and Versatile: Easily adapted with flavor twists or dietary preferences without losing its classic charm.
Ingredients You’ll Need
Getting the ingredients right is key to this recipe’s success. Each component plays a distinct role, creating balance between sweetness, creaminess, and light texture, ensuring every Italian Cream Stuffed Cannoncini is a delight.
- Italian Pasta Dough: Perfectly elastic and tender to create the ideal cone base, providing structure without heaviness.
- Mascarpone Cheese: Adds rich creaminess and a mild tang that elevates the filling’s flavor.
- Heavy Cream: Whipped to soft peaks, it brings airy lightness to the creamy stuffing.
- Sugar: Sweetens the filling naturally, balancing the richness of the cheese and cream.
- Vanilla Extract: Infuses a warm, aromatic flavor that enhances the dessert’s overall appeal.
- Eggs: Used in the dough to add richness and help achieve the perfect golden-brown pastry.
- Butter: Crucial for the dough’s flakiness and a subtle savory contrast to the sweet filling.
Variations for Italian Cream Stuffed Cannoncini
One of the best parts of this recipe is how easily you can tailor it to your taste or dietary needs, making it both comforting and refreshingly creative.
- Chocolate Drizzle: Add a melted dark or white chocolate drizzle on top for an indulgent twist.
- Fruit-Filled Variation: Mix fresh berries or lemon zest into the cream for a tangy surprise inside the cones.
- Dairy-Free Adaptation: Use coconut cream and vegan cream cheese substitutes still delivering creamy satisfaction.
- Nutty Crunch: Sprinkle crushed pistachios or almonds over the filling for added texture and flavor contrast.
- Spiced Filling: Incorporate cinnamon or nutmeg into the cream for warmth and seasonal flair.

How to Make Italian Cream Stuffed Cannoncini
Step 1: Prepare the Dough
Begin by combining flour, eggs, melted butter, and a pinch of salt to form a smooth, elastic dough. Knead thoroughly, then cover and let it rest for about 30 minutes to relax the gluten and make rolling easier.
Step 2: Roll and Cut the Pastry
Roll the rested dough thinly on a floured surface and cut it into strips suitable to wrap around cannoncini molds, which create the cone shape.
Step 3: Shape and Bake the Cones
Carefully wrap the dough strips around greased metal cone molds, seal the edge, and bake at 375°F (190°C) for 12–15 minutes until golden brown and crisp. Allow cooling before removing the molds to keep the cones intact.
Step 4: Prepare the Cream Filling
In a chilled bowl, whip the heavy cream and sugar until soft peaks form. Gently fold in mascarpone and vanilla until smooth and creamy, ensuring the filling is light but rich.
Step 5: Fill the Cannoncini
Using a piping bag or spoon, carefully fill each cooled cone with the cream mixture. Be generous to get that luscious, overflowing look and indulgent taste.
Step 6: Chill and Serve
Refrigerate the filled cannoncini for at least an hour to let the flavors meld and the filling firm up slightly before serving. This step enhances the creamy texture and makes handling easier.
Pro Tips for Making Italian Cream Stuffed Cannoncini
- Rest Your Dough: Allowing the dough to rest makes it easier to roll and less likely to shrink during baking.
- Use Chilled Bowls: Whipping cream in chilled bowls ensures faster and fluffier results for the filling.
- Don’t Overfill: Filling just enough creates the perfect balance and prevents messy spills when eating.
- Brush Dough with Butter: A light butter coating before baking adds extra flakiness and a golden color.
- Prepare Ahead: You can make and bake the cones a day ahead; store them in an airtight container to keep crispness.
How to Serve Italian Cream Stuffed Cannoncini
Garnishes
Lightly dust with powdered sugar or decorate with fresh mint leaves and a few berries for an elegant presentation that complements the creamy filling beautifully.
Side Dishes
Pair with a cup of freshly brewed espresso or a chilled glass of dessert wine to balance the sweetness while highlighting Italian flavors.
Creative Ways to Present
Arrange the cannoncini standing in a decorative glass or on a dessert tower for a stunning centerpiece. You can also dip the cone edges in chocolate for a festive touch.
Make Ahead and Storage
Storing Leftovers
Keep unfilled pastry cones stored in an airtight container at room temperature for up to two days to maintain crispness, and refrigerate the filled cannoncini tightly covered for a maximum of one day.
Freezing
Pastry cones freeze well if wrapped individually in plastic wrap and placed in a freezer bag—thaw at room temperature before filling. Avoid freezing filled cannoncini as the texture of the cream can change.
Reheating
Warm the empty cones in a low oven (300°F/150°C) for a few minutes to refresh their crispness. Do not reheat filled cones to preserve the delicate cream filling.
FAQs
Can I make the pastry cones without molds?
While metal cone molds ensure perfect shape, you can form cones by hand or use sturdy aluminum foil rolled into cone shapes as a substitute.
Is mascarpone necessary for the filling?
Mascarpone is preferred for its creamy texture and mild flavor, but cream cheese mixed with a bit of heavy cream can work as a substitute with slightly different taste.
How long can I store filled Italian Cream Stuffed Cannoncini?
Once filled, cannoncini should be consumed within 24 hours and kept refrigerated to maintain freshness and texture.
Can this recipe be made gluten-free?
Yes, using a gluten-free flour blend in place of regular flour for the dough works well, though texture may vary slightly.
What’s the best way to prevent the pastry from getting soggy?
Serve the filled cannoncini soon after filling or keep the cones and cream separate until just before serving to keep the pastry crisp.
Final Thoughts
Embracing the delicious charm of Italian Cream Stuffed Cannoncini is like welcoming a warm hug from Italy’s culinary heritage. This recipe brings together simple ingredients into a cherished dessert that’s both approachable and spectacular. Give it a try, and watch as every bite becomes an unforgettable moment of creamy, flaky bliss.
Related Posts
- Why Chocolate Cherry Sourdough Bread Will Wow You
- Why Peanut Butter Banana Chia Pudding Is a Game Changer
- Best Italian Easter Cookies to Brighten Your Holiday
Italian Cream Stuffed Cannoncini
Italian Cream Stuffed Cannoncini are delicate flaky pastry cones filled with a luscious, creamy mascarpone and whipped cream filling, offering a perfect balance of sweet, rich, and irresistible flavors. This authentic Italian dessert is ideal for any occasion, combining simple ingredients into a show-stopping treat with a crisp pastry and velvety cream filling.
- Prep Time: 45 minutes
- Cook Time: 15 minutes
- Total Time: 1 hour
- Yield: 12 cannoncini 1x
- Category: Dessert
- Method: Baking
- Cuisine: Italian
- Diet: Gluten Free (with flour substitution)
Ingredients
Dough Ingredients
- 2 cups all-purpose flour (or gluten-free flour blend for gluten-free version)
- 2 large eggs
- 4 tablespoons unsalted butter, melted (plus extra for brushing)
- Pinch of salt
Filling Ingredients
- 1 cup mascarpone cheese
- 1 cup heavy cream, chilled
- 1/4 cup sugar
- 1 teaspoon vanilla extract
Instructions
- Prepare the Dough: Combine the flour, eggs, melted butter, and a pinch of salt in a bowl. Knead thoroughly until a smooth, elastic dough forms. Cover and let it rest for about 30 minutes to relax the gluten and make rolling easier.
- Roll and Cut the Pastry: On a floured surface, roll the rested dough thinly. Cut it into strips suitable to wrap around cannoncini molds or forms to create the cone shapes.
- Shape and Bake the Cones: Lightly grease metal cone molds. Carefully wrap the dough strips around the molds, sealing the edges. Optionally brush with melted butter for extra flakiness and a golden color. Bake at 375°F (190°C) for 12–15 minutes until golden brown and crisp. Allow the cones to cool completely before removing the molds to keep them intact.
- Prepare the Cream Filling: In a chilled bowl, whip the heavy cream and sugar together until soft peaks form. Gently fold in the mascarpone cheese and vanilla extract until smooth and creamy, creating a light but rich filling.
- Fill the Cannoncini: Using a piping bag or spoon, carefully fill each cooled cone with the cream mixture. Be generous to achieve a luscious, overflowing look and indulgent taste, but avoid overfilling to prevent spills.
- Chill and Serve: Refrigerate the filled cannoncini for at least one hour to allow flavors to meld and the filling to firm slightly for better texture and easier handling.
Notes
- Rest your dough for at least 30 minutes to make rolling easier and prevent shrinkage during baking.
- Whip cream in chilled bowls for faster, fluffier results.
- Do not overfill the pastry cones to maintain balance and avoid mess.
- Brush dough lightly with butter before baking for enhanced flakiness and color.
- Pastry cones can be made a day ahead and stored in an airtight container to keep crispness.
- For gluten-free preparation, substitute regular flour with a gluten-free flour blend.
- Serve filled cannoncini soon after filling or keep pastry and cream separate until serving to prevent sogginess.
Nutrition
- Serving Size: 1 cannoncino
- Calories: 250
- Sugar: 10g
- Sodium: 75mg
- Fat: 18g
- Saturated Fat: 11g
- Unsaturated Fat: 6g
- Trans Fat: 0g
- Carbohydrates: 15g
- Fiber: 1g
- Protein: 4g
- Cholesterol: 70mg
Keywords: Italian dessert, cream stuffed pastry, cannoncini, mascarpone cream, flaky pastry, homemade Italian sweets, gluten-free dessert option

