How to Make Easter Bunny Coconut Tails Easily
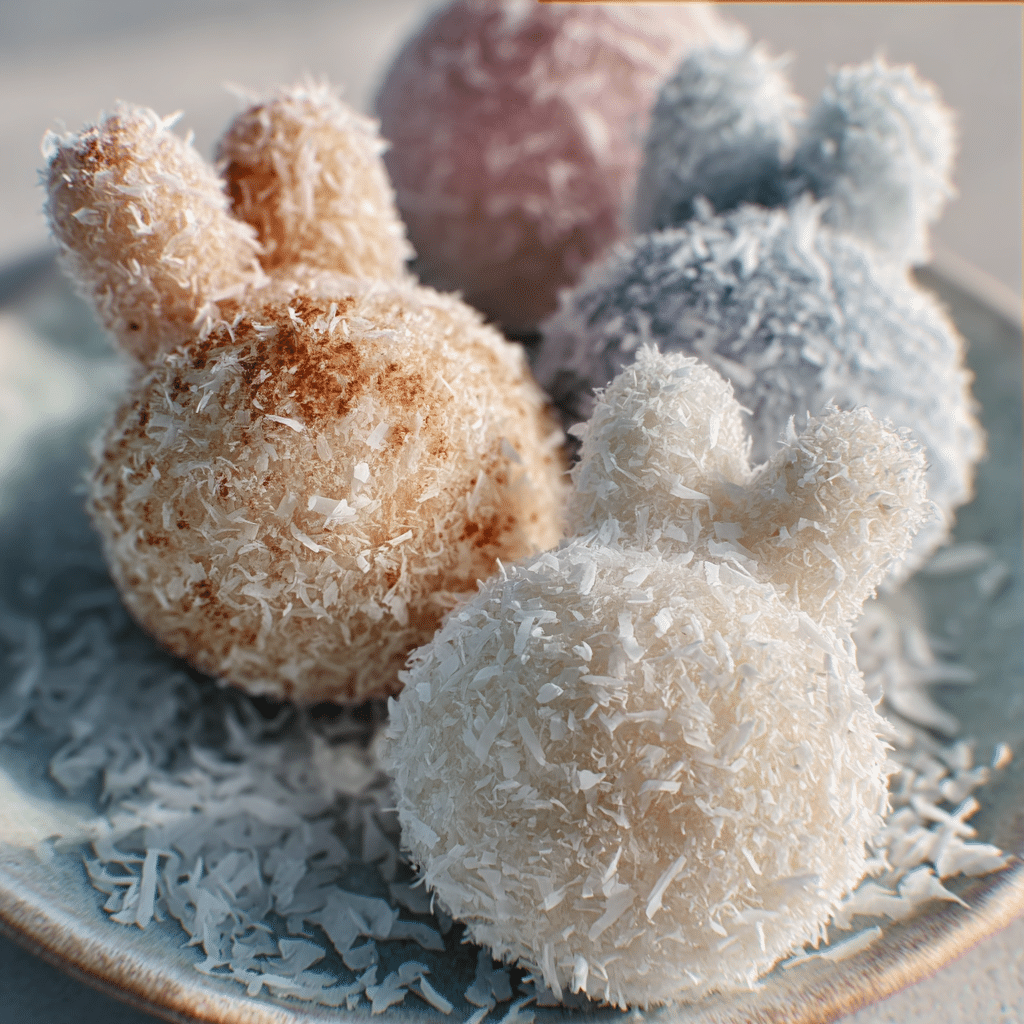
If you are looking for a charming, sweet treat that captures the spirit of spring and Easter celebrations, look no further than Easter Bunny Coconut Tails. This delightful recipe offers a perfect combination of chewy coconut, creamy sweetness, and a cute bunny shape that’s sure to impress kids and adults alike. Learn how to make Easter Bunny Coconut Tails easily with this simple, delicious recipe perfect for holiday treats and festive fun! It’s a hassle-free way to bring a burst of seasonal joy straight to your kitchen.
Why You’ll Love This Recipe
- Simple Ingredients: Uses basic pantry staples that are easy to find and affordable.
- Festive Fun: The adorable bunny shape adds a playful touch perfect for Easter celebrations.
- Perfect Texture: Combines chewy coconut with smooth creamy sweetness for a delightful bite.
- Kid-Friendly: Easy enough for children to help with, encouraging family baking time.
- Customizable: Can be adapted for dietary needs or personal flavor preferences without hassle.
Ingredients You’ll Need
These ingredients form the heart of the Easter Bunny Coconut Tails recipe. Each one adds a unique flavor or texture that makes this treat so special and light on effort. From the natural sweetness of coconut to the smoothness of condensed milk, every component counts.
- Shredded Coconut: Use sweetened or unsweetened depending on your preference for sweetness and texture.
- Sweetened Condensed Milk: Acts as a binding agent and adds creamy sweetness to hold everything together.
- Vanilla Extract: Enhances the flavor with a warm, aromatic touch.
- Powdered Sugar: For dusting the final treats, adding a light sweetness and beautiful finish.
- Mini Chocolate Chips or Candy Eyes: These are used to give the bunnies charming faces and extra character.
- Almonds or Pretzel Sticks (Optional): Perfect for bunny ears or tails, adding crunch and flair.
Variations for Easter Bunny Coconut Tails
Feel free to mix things up with these easy variations to suit your taste or dietary needs. These tweaks help you keep the treats fun and fresh every time you make them.
- Vegan Substitute: Swap sweetened condensed milk for coconut condensed milk or a mix of coconut cream and maple syrup for a dairy-free option.
- Chocolate-Dipped: Dip the finished coconut tails in melted dark or milk chocolate for an extra indulgent twist.
- Nutty Delight: Add finely chopped nuts like pistachios, pecans, or walnuts to the coconut mixture for added crunch.
- Flavored Extracts: Experiment with almond, orange, or lemon extracts to give the recipe a fun citrus or nutty flair.
- Gluten-Free Addition: Use gluten-free pretzel sticks or simple candy decorations to keep the recipe gluten-friendly.

How to Make Easter Bunny Coconut Tails
Step 1: Prepare the Coconut Mixture
In a large mixing bowl, combine shredded coconut, sweetened condensed milk, and vanilla extract. Stir thoroughly until the mixture is sticky and holds together well. This sticky consistency is key for shaping the tails perfectly.
Step 2: Shape the Bunny Tails
Using your hands, scoop out small portions of the mixture and form them into oval tail shapes. Make sure they are compact but not too hard. You want a soft, fluffy texture that holds its shape.
Step 3: Add Bunny Features
Press mini chocolate chips or candy eyes onto one end of each tail to create the bunny’s face. For ears, gently insert almonds or pretzel sticks into the top of each tail. This creates an adorable and recognizable bunny shape.
Step 4: Chill to Set
Place the shaped tails onto a lined baking sheet and refrigerate for at least 30 minutes. Chilling helps them firm up and retain their shape when served.
Step 5: Dust and Serve
Before serving, lightly dust the tops with powdered sugar to add a festive snowy effect. Arrange them on a platter or in decorative Easter baskets for a charming presentation.
Pro Tips for Making Easter Bunny Coconut Tails
- Use Fresh Coconut: Freshly shredded coconut tends to have the best flavor and texture.
- Don’t Overpack: Gently shape the tails without squeezing too hard to maintain a light, fluffy bite.
- Chill Properly: Ensure the treats are well chilled before serving to keep their bunny shape intact.
- Customize Decorations: Use edible markers or small candies to add more personality to each bunny.
- Work Quickly: The sweetened condensed milk can make the mixture sticky, so shape the tails promptly to prevent sticking to your hands.
How to Serve Easter Bunny Coconut Tails
Garnishes
Pair the bunnies with fresh mint leaves, edible flowers, or a light dusting of cocoa powder to enhance both the look and flavor. Colorful sprinkles can also add a playful touch for kids.
Side Dishes
Serve these coconut tails alongside fresh fruit platters, hot cocoa, or spring-themed cupcakes. Their light sweetness pairs wonderfully with tart berries and creamy beverages.
Creative Ways to Present
Arrange Easter Bunny Coconut Tails in Easter baskets lined with pastel shredded paper or nestle them around decorative Easter eggs. You can also place them on festive dessert trays for holiday parties to wow your guests.
Make Ahead and Storage
Storing Leftovers
Keep any leftovers in an airtight container in the refrigerator where they will stay fresh for up to 5 days. This makes them a convenient make-ahead treat.
Freezing
Easter Bunny Coconut Tails freeze well. Wrap each tail individually in parchment paper and store them in a freezer-safe container for up to 2 months. Thaw in the refrigerator before serving.
Reheating
No need to reheat these treats. They are best served chilled or at room temperature to maintain their texture and shape.
FAQs
Can I use unsweetened shredded coconut for this recipe?
Yes, unsweetened shredded coconut will work fine, but the final Easter Bunny Coconut Tails will be less sweet. You might want to add a little extra powdered sugar to balance the flavors.
Is there a dairy-free version of Easter Bunny Coconut Tails?
Absolutely! You can substitute sweetened condensed milk with a dairy-free condensed coconut milk or use a mixture of coconut cream and maple syrup to keep it vegan friendly.
How long do Easter Bunny Coconut Tails last?
Stored properly in the fridge, these treats last up to 5 days. For extended storage, freezing is an excellent option.
Can I make these without shaping them into bunnies?
Of course! You can simply roll the mixture into small balls or form other fun shapes if you prefer. The flavor remains delicious either way.
Are Easter Bunny Coconut Tails suitable for kids to help make?
Yes, this recipe is wonderful for kids. The shaping and decorating steps are especially fun and safe with adult supervision.
Final Thoughts
Making Easter Bunny Coconut Tails is a joyful and easy way to add a bit of festive magic to your holiday table. With simple ingredients and straightforward steps, anyone can whip up these charming treats that taste just as delightful as they look. Don’t wait to bring this fun and tasty recipe into your Easter celebrations—everyone will love them!
Related Posts
- Why Chocolate Cherry Sourdough Bread Will Wow You
- Why Peanut Butter Banana Chia Pudding Is a Game Changer
- Best Italian Easter Cookies to Brighten Your Holiday
Easter Bunny Coconut Tails

Easter Bunny Coconut Tails are a delightful, chewy coconut treat shaped into cute bunny tails, perfect for celebrating spring and Easter. Made with simple pantry staples like shredded coconut and sweetened condensed milk, these festive sweets combine creamy sweetness with playful bunny features, making them ideal for family baking and holiday fun.
- Prep Time: 15 minutes
- Cook Time: 0 minutes
- Total Time: 45 minutes
- Yield: 20-24 tails 1x
- Category: Appetizers
- Method: No-Bake / Refrigerate
- Cuisine: American
- Diet: Gluten Free
Ingredients
Main Ingredients
- 2 cups shredded coconut (sweetened or unsweetened, based on preference)
- 1/2 cup sweetened condensed milk
- 1 teaspoon vanilla extract
Decorations
- Mini chocolate chips or candy eyes (for bunny faces)
- Almonds or pretzel sticks (optional, for bunny ears or tails)
- Powdered sugar (for dusting)
Instructions
- Prepare the Coconut Mixture: In a large mixing bowl, combine shredded coconut, sweetened condensed milk, and vanilla extract. Stir thoroughly until the mixture becomes sticky and holds together well. This consistency is key for shaping the tails perfectly.
- Shape the Bunny Tails: Using your hands, scoop out small portions of the mixture and form them into oval tail shapes. Ensure they are compact without being too hard, aiming for a soft, fluffy texture that holds its shape.
- Add Bunny Features: Press mini chocolate chips or candy eyes onto one end of each tail to create the bunny’s face. For ears, gently insert almonds or pretzel sticks into the top of each tail, crafting an adorable and recognizable bunny shape.
- Chill to Set: Place the shaped tails onto a lined baking sheet and refrigerate for at least 30 minutes. Chilling helps them firm up and retain their shape when served.
- Dust and Serve: Before serving, lightly dust the tops with powdered sugar to add a festive snowy effect. Arrange them on a platter or in decorative Easter baskets for a charming presentation.
Notes
- Use freshly shredded coconut for the best flavor and texture.
- Do not overpack the mixture; gently shape tails to maintain a light, fluffy bite.
- Ensure treats are thoroughly chilled before serving to keep their shape intact.
- Customize decorations with edible markers or small candies for added personality.
- Work quickly as the mixture can become sticky; shaping promptly helps prevent sticking to hands.
Nutrition
- Serving Size: 1 tail
- Calories: 90
- Sugar: 8g
- Sodium: 10mg
- Fat: 5g
- Saturated Fat: 4.5g
- Unsaturated Fat: 0.3g
- Trans Fat: 0g
- Carbohydrates: 10g
- Fiber: 1g
- Protein: 1g
- Cholesterol: 5mg
Keywords: Easter treats, Coconut tails, No-bake dessert, Kid-friendly recipe, Gluten free Easter dessert