How to Make Chicken Kiev with Garlic Butter

If you’re craving a dish that’s crispy on the outside, bursting with rich garlic butter on the inside, and downright comforting to eat, then Chicken Kiev with Garlic Butter is exactly what you need. This classic dish combines tender chicken breasts wrapped around a luscious garlic herb butter, then coated in a golden breadcrumb crust. Whether you’re cooking for a special occasion or a cozy dinner at home, this recipe is straightforward yet impressively delicious, promising a perfect balance of aroma, texture, and flavor in every bite.
Why You’ll Love This Recipe
- Irresistibly Moist: The garlic butter steam inside keeps the chicken juicy and tender every time.
- Flavor Explosion: Infused with fresh garlic and herbs, it offers a savory punch that’s hard to resist.
- Crispy Comfort: The golden breadcrumb crust delivers that satisfying crunch we all love in fried or baked chicken dishes.
- Elegant Yet Simple: It looks fancy enough for guests but is straightforward enough for beginner cooks.
- Customizable: Easily adapted with different herbs or a spicy twist depending on your mood and pantry staples.
Ingredients You’ll Need
This recipe shines because of its simple, fresh ingredients, each playing a vital role to create that perfect harmony of texture and flavor. From the creamy garlic butter core to the crisp breadcrumb shell, every item counts.
- Chicken breasts: Boneless and skinless, these are your main protein and vessel for the garlic butter filling.
- Unsalted butter: Softened to mix easily and create that melt-in-your-mouth interior.
- Garlic cloves: Fresh and minced to infuse robustness into the butter mixture.
- Fresh parsley: Chopped finely to add a herby freshness and vibrant color.
- Lemon zest: Adds a subtle brightness that cuts through the richness.
- All-purpose flour: Helps seal and prepare chicken for breading, also helps the coating stick perfectly.
- Eggs: Beaten for dredging, creating a sticky layer for breadcrumbs.
- Breadcrumbs: Plain or panko works best for a crunchy texture.
- Salt and pepper: Essential seasonings to enhance the natural flavors.
- Vegetable oil or clarified butter: For frying to achieve that golden exterior without burning.
Variations for Chicken Kiev with Garlic Butter
This classic Chicken Kiev with Garlic Butter recipe is wonderfully adaptable. Whether you want to make it spicier, healthier, or add a twist, it’s easy to customize according to what you love or have on hand.
- Herb swap: Replace parsley with tarragon, chives, or dill for a different herbal note.
- Cheesy core: Add shredded mozzarella or parmesan inside the butter for an oozy cheesy surprise.
- Spicy kick: Mix chili flakes or cayenne pepper into the butter for subtle heat.
- Oven-only version: Skip frying and bake the Kievs for a lighter version with less oil.
- Gluten-free option: Use gluten-free flour and breadcrumbs to cater to dietary needs without sacrificing taste.

How to Make Chicken Kiev with Garlic Butter
Step 1: Prepare the Garlic Butter
Start by softening unsalted butter at room temperature. Finely mince fresh garlic and parsley, then mix them with lemon zest, salt, and pepper into the butter. Shape this mixture into a log, wrap it tightly in plastic wrap, and chill in the fridge until firm. This will be the flavorful core inside your chicken.
Step 2: Prepare the Chicken Breasts
Take your boneless chicken breasts and carefully pound them flat to an even thickness of about half an inch. This creates a perfect pocket and ensures even cooking later.
Step 3: Assemble the Kievs
Place a chilled piece of garlic butter in the center of each flattened breast. Fold the sides over and roll tightly, securing the butter inside completely to prevent leaking during cooking. You can use toothpicks if needed.
Step 4: Coat the Chicken
Set up a dredging station with three shallow bowls: one with flour seasoned with salt and pepper, one with beaten eggs, and one with breadcrumbs. Roll each chicken roll in flour, dip into egg, then coat thoroughly with breadcrumbs.
Step 5: Cook the Chicken Kiev with Garlic Butter
Heat vegetable oil or clarified butter in a deep skillet over medium heat. Carefully fry the coated chicken rolls until golden brown on all sides, about 3-4 minutes per side. Then transfer to a preheated oven at 375°F (190°C) to finish cooking through for around 15 minutes. You want the chicken cooked but garlic butter melted inside.
Pro Tips for Making Chicken Kiev with Garlic Butter
- Keep the butter cold: Chilling the garlic butter helps prevent it from leaking during cooking.
- Use even thickness: Pound your chicken evenly to avoid undercooked or dry spots.
- Seal well: Tuck and roll chicken tightly around the butter, using toothpicks if necessary.
- Double coat: For extra crispiness, dip the chicken in egg and breadcrumbs twice.
- Use a thermometer: Cook chicken until it reaches an internal temperature of 165°F (74°C) for safety and juiciness.
How to Serve Chicken Kiev with Garlic Butter
Garnishes
Sprinkle freshly chopped parsley or chives over the chicken to add a fresh, vibrant touch and a pop of color that pairs beautifully with the golden crust.
Side Dishes
This rich dish pairs wonderfully with light side options like steamed green beans, buttery mashed potatoes, or a crisp garden salad to balance the richness and freshness on your plate.
Creative Ways to Present
Slice the chicken Kiev diagonally to reveal the buttery center oozing out, and serve alongside a lemon wedge for guests to squeeze over, elevating the flavors with a bright citrus finish.
Make Ahead and Storage
Storing Leftovers
Place leftover Chicken Kiev with Garlic Butter in an airtight container and refrigerate for up to 3 days. It’s best to enjoy it within this window to maintain freshness and flavor.
Freezing
You can freeze uncooked assembled Kievs by wrapping them tightly in plastic wrap and foil, storing them in the freezer for up to 1 month. Cook from frozen by increasing cooking time accordingly.
Reheating
Reheat leftovers gently in a low oven (around 300°F or 150°C) to avoid drying out the chicken while warming the garlic butter inside, or use an air fryer for a crisp finish.
FAQs
Can I use chicken thighs instead of breasts?
Yes! Boneless, skinless chicken thighs can be used, offering a richer flavor and slightly more forgiving texture, but be sure to adjust cooking time accordingly.
How do I prevent the garlic butter from leaking out?
Keep the butter well chilled and wrap the chicken tightly with sealed edges. Double dredging the chicken also helps form a strong outer crust to contain the butter.
Is it okay to bake Chicken Kiev instead of frying?
Absolutely. Baking is a healthier alternative; just brush the Kievs with oil and bake at 375°F (190°C) for about 25-30 minutes until golden and cooked through.
What kind of breadcrumbs should I use?
Panko breadcrumbs work wonderfully for a crunchy texture, but regular plain breadcrumbs are also suitable if panko is unavailable.
Can I prepare Chicken Kiev with Garlic Butter ahead of time?
Yes, you can assemble the Kievs completely and refrigerate or freeze them before cooking. This makes it easy to enjoy a fuss-free meal any night.
Final Thoughts
Chicken Kiev with Garlic Butter is truly one of those dishes that feels like a warm embrace—crispy, buttery, and bursting with flavor. Whether it’s a weekday treat or a special weekend dinner, it’s an impressive but approachable recipe that will delight anyone lucky enough to have it on their plate. I hope you give this recipe a try and enjoy the wonderful experience of homemade Chicken Kiev with Garlic Butter as much as I do!
Related Posts
- Easy Tacos de Canasta: Simple Recipe Guide
- Why Easy Oats Haleem is a Must-Try Recipe
- Easy Instant Pot Chicken and Sausage Jambalaya Recipe
Chicken Kiev with Garlic Butter
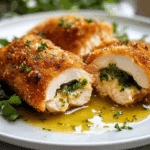
Chicken Kiev with Garlic Butter is a classic dish featuring tender, boneless chicken breasts wrapped around a flavorful garlic herb butter, coated in a crispy golden breadcrumb crust. This comforting recipe offers a perfect balance of moist, juicy chicken with a rich, aromatic buttery center, finished with a crunchy exterior. Ideal for both special occasions and cozy dinners, the recipe is straightforward, customizable, and delivers a deliciously elegant meal.
- Prep Time: 20 minutes
- Cook Time: 25 minutes
- Total Time: 45 minutes
- Yield: 4 servings 1x
- Category: Appetizers
- Method: Frying and Baking
- Cuisine: European
- Diet: Gluten Free (if gluten-free flour and breadcrumbs are used)
Ingredients
For the Garlic Herb Butter
- 6 tbsp unsalted butter, softened
- 3 garlic cloves, minced
- 2 tbsp fresh parsley, finely chopped
- 1 tsp lemon zest
- Salt and pepper to taste
For the Chicken Kiev
- 4 boneless, skinless chicken breasts
- ½ cup all-purpose flour (or gluten-free flour for GF option)
- 2 large eggs, beaten
- 1 cup breadcrumbs (plain or panko, or gluten-free breadcrumbs)
- Salt and pepper to season
- Vegetable oil or clarified butter, for frying
Instructions
- Prepare the Garlic Butter: Soften unsalted butter at room temperature. Finely mince fresh garlic and parsley, then mix them with lemon zest, salt, and pepper into the butter. Shape this mixture into a log, wrap it tightly in plastic wrap, and chill in the fridge until firm to create the flavorful core.
- Prepare the Chicken Breasts: Pound the boneless, skinless chicken breasts flat to an even thickness of about ½ inch using a meat mallet or rolling pin. This ensures even cooking and creates a pocket for the butter.
- Assemble the Kievs: Place a chilled piece of garlic butter in the center of each flattened chicken breast. Fold the sides over and roll tightly to enclose the butter completely, securing with toothpicks if needed to prevent leakage during cooking.
- Coat the Chicken: Set up three shallow bowls: one with flour seasoned with salt and pepper, one with beaten eggs, and one with breadcrumbs. Dredge each chicken roll first in the flour, then dip into the egg, and finally coat thoroughly with breadcrumbs. For extra crispiness, repeat the egg and breadcrumb coating once more.
- Cook the Chicken Kiev: Heat vegetable oil or clarified butter in a deep skillet over medium heat. Fry the coated chicken rolls carefully until golden brown on all sides, about 3-4 minutes per side. Transfer them to a preheated oven at 375°F (190°C) and bake for approximately 15 minutes until the chicken is cooked through and the garlic butter has melted inside. Use a thermometer to ensure an internal temperature of 165°F (74°C).
Notes
- Keep the garlic butter well chilled before wrapping to prevent leaking during cooking.
- Pound chicken breasts evenly to avoid undercooked or dry spots.
- Seal chicken rolls tightly, using toothpicks if needed, to keep the butter secured.
- For extra crunch, double coat the chicken in egg and breadcrumbs.
- Use a meat thermometer to ensure chicken reaches 165°F (74°C) for safety.
Nutrition
- Serving Size: 1 stuffed chicken breast
- Calories: 450 kcal
- Sugar: 1 g
- Sodium: 350 mg
- Fat: 28 g
- Saturated Fat: 14 g
- Unsaturated Fat: 12 g
- Trans Fat: 0 g
- Carbohydrates: 15 g
- Fiber: 1 g
- Protein: 35 g
- Cholesterol: 120 mg
Keywords: Chicken Kiev, garlic butter chicken, crispy chicken, garlic herb butter, classic chicken dish, stuffed chicken breast