How to Make a Chocolate Easter Egg Nest Cake
Discover the joyful magic of spring with this delightful Chocolate Easter Egg Nest Cake. This festive dessert layers rich chocolate flavor with the whimsical charm of a bird’s nest filled with colorful Easter eggs, making it an irresistible treat that’s perfect for celebrations or a sweet everyday indulgence. Learn to create this show-stopping cake from scratch with simple ingredients and easy steps that anyone can follow, bringing both fun and flavor to your table.
Why You’ll Love This Recipe
- Festive and Fun Presentation: The nest design captures the spirit of Easter, making it a centerpiece that wows guests and kids alike.
- Rich Chocolate Flavor: Perfectly balanced without being overly sweet, the chocolate base is a dream for any chocoholic.
- Simple Ingredients: You only need a handful of pantry staples to craft this delightful dessert with ease.
- Versatile and Customizable: From nut-free versions to vegan adaptations, this cake suits many dietary preferences.
- Perfect for All Skill Levels: Whether you’re a beginner or an experienced baker, the clear instructions make baking enjoyable.
Ingredients You’ll Need
Gathering the right ingredients is half the fun and guarantees the best outcome. Each element here plays a crucial role in creating the perfect balance of flavor, texture, and appearance for your Chocolate Easter Egg Nest Cake.
- All-Purpose Flour: The foundation for the cake’s soft and tender crumb.
- Cocoa Powder: Adds deep, intense chocolate flavor with beautiful color.
- Sugar: Sweetens the cake while helping create a moist texture.
- Butter: Provides richness and contributes to the cake’s melt-in-your-mouth softness.
- Eggs: Bind ingredients together and add structure to the cake.
- Baking Powder: Ensures the cake rises perfectly for a light finish.
- Milk: Balances the batter and keeps the texture tender.
- Chocolate Chips or Chopped Chocolate: For added pockets of melty chocolate throughout the cake.
- Mini Chocolate Easter Eggs: The charming “nest eggs” that top and decorate your cake.
- Shredded Coconut or Chocolate Shavings: To mimic the nest’s texture and complete the look beautifully.
Variations for Chocolate Easter Egg Nest Cake
This recipe is delightfully adaptable, allowing you to tweak flavors, textures, or dietary needs without losing that magical nest effect. Feel free to experiment to match your style and occasion.
- Nut-Free Version: Simply omit nuts or replace any nut toppings with extra chocolate shavings or coconut flakes.
- Vegan Adaptation: Use plant-based butter, non-dairy milk, and flax eggs for the same moist texture.
- Different Chocolate Types: Swap dark chocolate chips for white or milk chocolate for varying sweetness.
- Fruit-Infused Nest: Add dried cherries or orange zest to the batter for a fresh twist.
- Gluten-Free Alternative: Use a certified gluten-free flour blend to keep everyone happy.

How to Make Chocolate Easter Egg Nest Cake
Step 1: Prepare the Cake Batter
Start by preheating your oven and greasing your cake pans. In a bowl, sift together flour, cocoa powder, and baking powder to ensure a lump-free base. In a separate bowl, cream butter and sugar until fluffy. Beat in eggs one at a time, then alternate adding the dry mixture and milk until smooth. Stir in chocolate chips for delightful pockets of gooey goodness.
Step 2: Bake Your Cake
Pour the batter evenly into the prepared pans and bake for 25 to 30 minutes or until a toothpick comes out clean. Cooling is essential, so allow the cakes to rest on a wire rack while you prepare the nest decoration.
Step 3: Create the Nest Base
Once cooled, layer the cakes with your favorite frosting or chocolate ganache. Shape the top layer so it forms a shallow “bowl” shape—this will become your nest. Use a spatula to gently sculpt the edges higher than the center, providing a perfect spot to hold the Easter eggs.
Step 4: Craft the Nest Texture
Sprinkle shredded coconut or chocolate shavings over the nest to mimic twigs and straw. Press lightly so they stick to the frosting or ganache. This step is key to making your cake look like a charming bird’s nest full of natural textures.
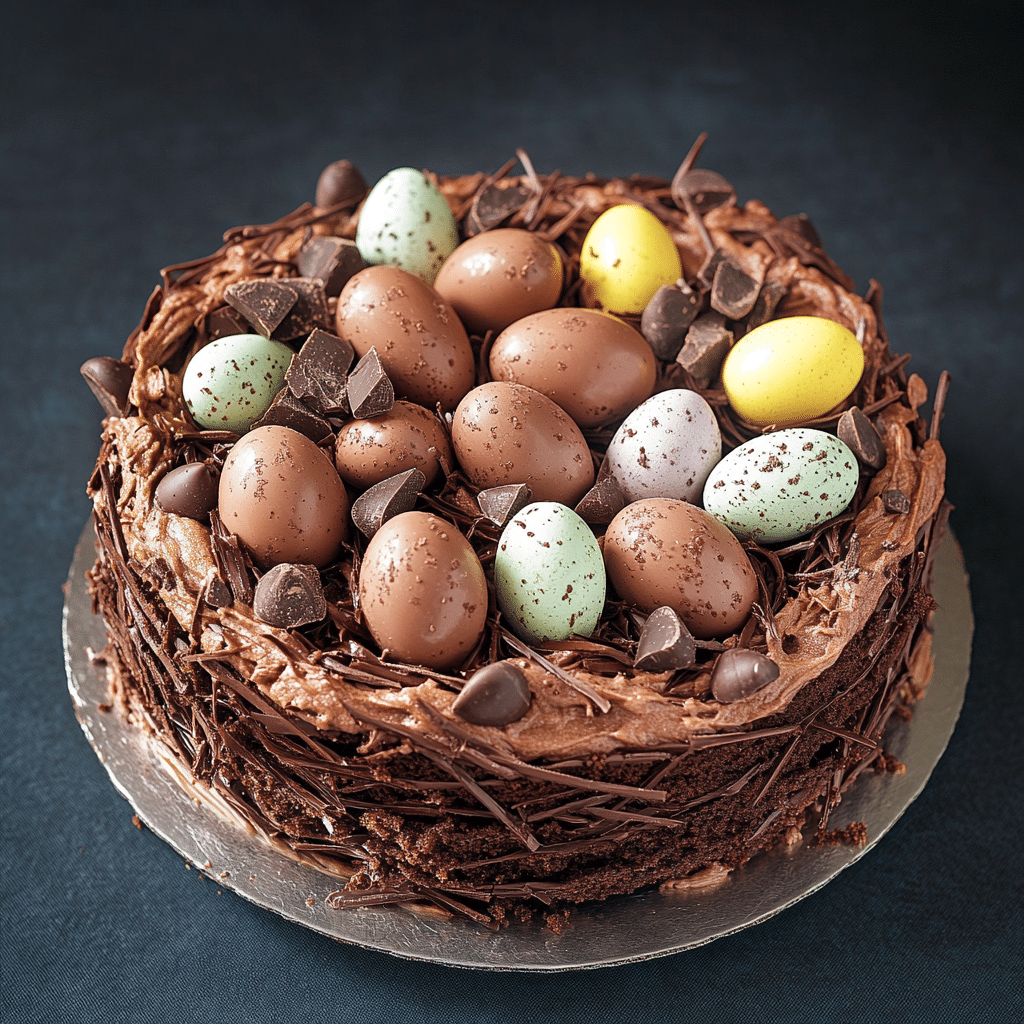
Step 5: Decorate with Chocolate Easter Eggs
Arrange mini chocolate Easter eggs in the center of the nest. You can mix colors and sizes for visual appeal or choose uniform eggs for a neater look. The vibrant chocolates add that festive touch that makes the cake irresistible.
Pro Tips for Making Chocolate Easter Egg Nest Cake
- Choose Quality Cocoa: A good-quality cocoa powder enhances the chocolate flavor and color dramatically.
- Don’t Overmix: Mix your batter just until combined to avoid a dense cake.
- Let the Cake Cool Completely: Frosting a warm cake can cause melting and a messy finish.
- Use Fresh Eggs: Fresh eggs boost texture and richness in the cake.
- Freeze Mini Eggs Before Serving: Chilled eggs look shiny and will hold their shape better in warmer homes.
- Toast Coconut Lightly: Toasting the coconut before applying it to the nest adds a lovely depth of flavor.
How to Serve Chocolate Easter Egg Nest Cake
Garnishes
Add additional mini chocolate eggs around the base or sprinkle edible glitter over the nest for a festive sparkle that elevates the cake’s presentation.
Side Dishes
Pair this cake with fresh berries or a simple fruit salad to balance the richness, or serve it alongside a scoop of vanilla ice cream for a classic crowd-pleasing combo.
Creative Ways to Present
Place your nest cake on a bed of fresh edible flowers or green-tinted shredded coconut to resemble moss, creating an authentic and enchanting Easter scene right on your dessert table.
Make Ahead and Storage
Storing Leftovers
Keep your Chocolate Easter Egg Nest Cake covered loosely with plastic wrap or in an airtight container at room temperature for up to two days to preserve freshness.
Freezing
You can freeze the unfrosted cake layers tightly wrapped for up to three months; frost and decorate just before serving for best results.
Reheating
Allow frozen cake to thaw completely at room temperature before decorating. If served cold, it’s delicious as is, but you can warm slices gently in the microwave for about 10 seconds to enhance the chocolate’s aroma.
FAQs
Can I use a different type of chocolate for this cake?
Absolutely! Feel free to substitute dark, milk, or white chocolate chips based on your preference; each variation gives a slightly different sweetness and richness.
Is this recipe suitable for kids to help make?
Definitely! The steps are simple and safe, making it a fun baking project to enjoy with children during Easter or any festive occasion.
Can I make this cake gluten-free?
Yes, by using a gluten-free flour blend, you can easily adapt the recipe while maintaining delicious results and satisfying texture.
How long does this cake stay fresh?
The cake stays fresh for about two days at room temperature; refrigeration can extend this but may affect moistness slightly.
What if I can’t find mini chocolate Easter eggs?
You can substitute with chocolate-covered nuts, small truffles, or even colorful candy-coated chocolates — just anything that fits the nest theme!
Final Thoughts
Making this Chocolate Easter Egg Nest Cake brings not just a delicious dessert but a festive experience that’s perfect for Easter or any joyful gathering. Its playful design combined with rich, comforting chocolate flavor makes every bite a celebration. Don’t hesitate to give this recipe a try and share the sweet tradition with friends and family—it’s sure to become a treasured favorite!
Related Posts
- Why Homemade Peach Ice Cream Is Irresistible
- Why Baby Lemon Impossible Pies Delight Everyone
- Why Raspberry Lemon Tart Bars Are Perfect Snacks
Chocolate Easter Egg Nest Cake
Celebrate spring with this Chocolate Easter Egg Nest Cake, a festive and fun dessert featuring a rich chocolate cake shaped like a bird’s nest and decorated with colorful mini chocolate Easter eggs. This easy-to-make cake combines simple pantry ingredients with a visually striking design that’s perfect for Easter celebrations or any joyful occasion.
- Prep Time: 20 minutes
- Cook Time: 25-30 minutes
- Total Time: 1 hour
- Yield: 8-10 servings 1x
- Category: Dessert
- Method: Baking
- Cuisine: International
- Diet: Gluten Free (with substitution options)
Ingredients
Cake Ingredients
- 1 ¾ cups all-purpose flour (or gluten-free flour blend for gluten-free option)
- ¾ cup unsweetened cocoa powder
- 1 ½ teaspoons baking powder
- 1 cup sugar
- ½ cup unsalted butter, softened (use plant-based butter for vegan)
- 3 large eggs (or 3 flax eggs for vegan)
- 1 cup milk (or non-dairy milk for vegan)
- ¾ cup chocolate chips or chopped chocolate (dark, milk, or white)
Decoration Ingredients
- Mini chocolate Easter eggs
- ½ cup shredded coconut or chocolate shavings (lightly toasted if desired)
- Your choice of frosting or chocolate ganache for layering and shaping
Instructions
- Prepare the Cake Batter: Preheat your oven to the recommended temperature and grease your cake pans. In a bowl, sift together the flour (or gluten-free blend), cocoa powder, and baking powder to ensure a lump-free dry mixture. In a separate large bowl, cream the softened butter and sugar until fluffy. Beat in the eggs one at a time, then alternately add the dry ingredients and milk until the batter is smooth. Finally, stir in the chocolate chips to create delightful pockets of melty chocolate.
- Bake Your Cake: Pour the batter evenly into the prepared pans. Bake for 25 to 30 minutes, or until a toothpick inserted in the center comes out clean. Remove from the oven and allow cakes to cool completely on a wire rack before decorating.
- Create the Nest Base: Once the cake layers are cooled, spread your favorite frosting or chocolate ganache between the layers. On the top layer, sculpt the cake into a shallow bowl shape by making the edges higher than the center using a spatula. This will form the base of your nest.
- Craft the Nest Texture: Gently sprinkle shredded coconut or chocolate shavings over the top shaped nest, pressing lightly so they adhere to the frosting or ganache. This mimics the natural twigs and straw texture of a bird’s nest.
- Decorate with Chocolate Easter Eggs: Arrange mini chocolate Easter eggs in the center of the nest. Mix colors and sizes for a playful look, or keep eggs uniform for a tidy presentation. Optionally refrigerate the cake to help the eggs keep their shape and shine.
Notes
- Choose good-quality cocoa powder for richer chocolate flavor and deeper color.
- Mix the batter only until ingredients are combined to avoid a dense cake.
- Allow the cake to cool completely before frosting to prevent melting.
- Use fresh eggs for the best texture and richness.
- Freeze mini eggs before decorating to keep them shiny and solid.
- Lightly toast the shredded coconut to enhance flavor before applying.
Nutrition
- Serving Size: 1 slice (approximate)
- Calories: 320
- Sugar: 28g
- Sodium: 150mg
- Fat: 18g
- Saturated Fat: 10g
- Unsaturated Fat: 6g
- Trans Fat: 0g
- Carbohydrates: 35g
- Fiber: 3g
- Protein: 4g
- Cholesterol: 55mg
Keywords: chocolate cake, Easter cake, bird nest cake, festive dessert, gluten-free cake, vegan chocolate cake, holiday dessert