How to Make Easter Rice Krispies Eggs Fast
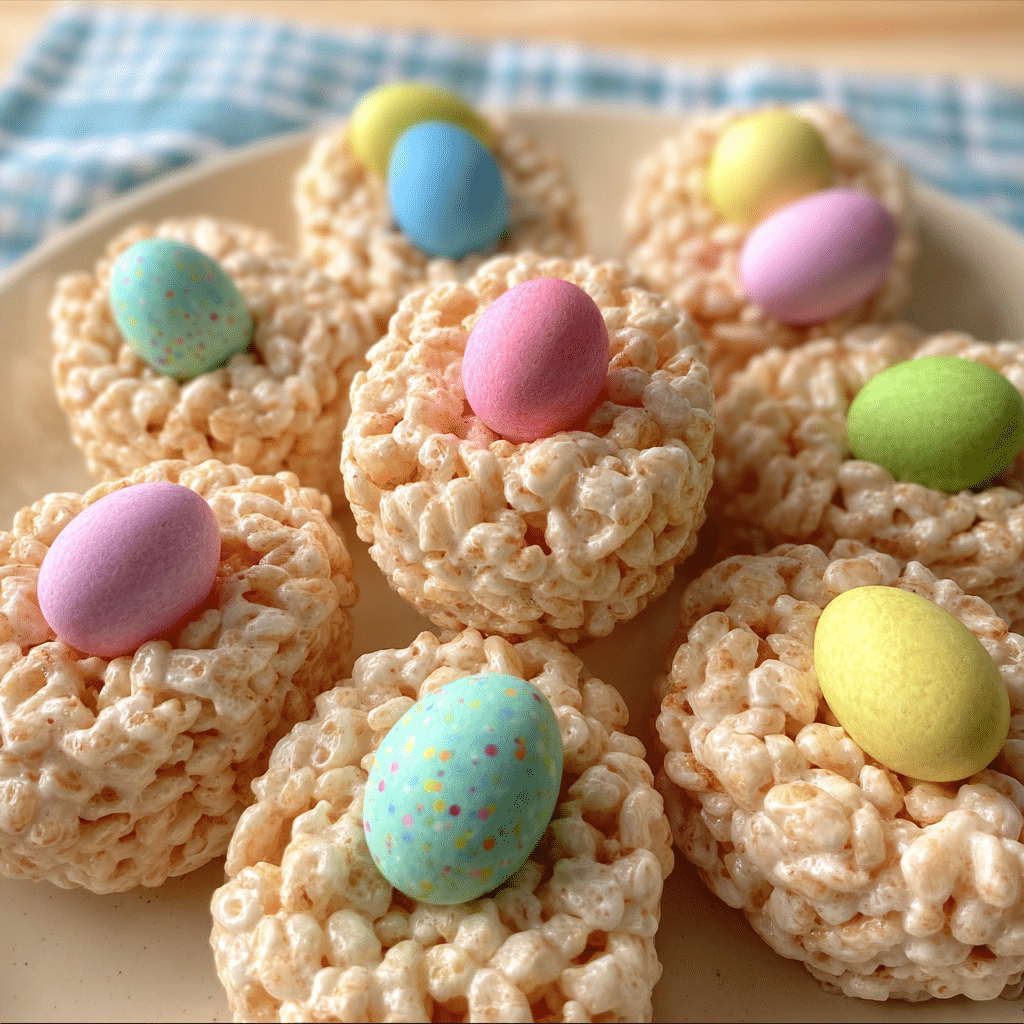
If you’re looking for a quick, fun, and utterly delicious treat to celebrate spring, look no further than Easter Rice Krispies Eggs! This simple recipe combines the signature crunch and chewy texture of classic Rice Krispies with the iconic egg shape and festive colors that make it perfect for Easter celebrations. Whether you’re hosting a last-minute party or want a sweet craft to enjoy with the kids, these Easter Rice Krispies Eggs are sure to delight everyone with minimal effort and maximum joy.
Why You’ll Love This Recipe
- Speedy Preparation: You can whip up these Easter Rice Krispies Eggs in under 30 minutes, making them ideal for last-minute treats.
- Kid-Friendly Fun: Shaping and decorating Rice Krispies Eggs is a creative activity that kids adore and can safely participate in.
- Minimal Ingredients: Using pantry staples means you don’t need to make a special trip to the store to enjoy this festive treat.
- Customizable Colors and Flavors: Easily adapt the colors and add-ins to suit your taste or stick to traditional Easter pastels.
- Perfect for Gifting: Wrapped up in cellophane or placed in decorative boxes, these eggs make delightful homemade gifts.
Ingredients You’ll Need
Grab a handful of basic ingredients that come together beautifully to create the perfect balance of gooey, crunchy, and colorful Easter Rice Krispies Eggs. Each item serves a purpose—whether adding chewiness, sweetness, or that classic cereal crunch you love.
- Rice Krispies Cereal: The foundational crispy texture that gives these eggs their signature crunch.
- Marshmallows: Melted to create the sticky, chewy bind to hold everything together.
- Butter: Enhances richness and helps prevent the mixture from sticking to your hands.
- Food Coloring: Adds festive pastel colors that bring your Easter eggs to life.
- Vanilla Extract: A dash for subtle warmth and added flavor depth.
Variations for Easter Rice Krispies Eggs
Feel free to get creative with this adaptable recipe! It’s a great base to experiment with different mix-ins, dietary tweaks, and flavor boosts to make your Easter Rice Krispies Eggs truly your own.
- Chocolate Drizzle: Add a drizzle of melted chocolate over the eggs for extra decadence and a fancy touch.
- Nut-Free Version: Skip any nut toppings and stick to simple sprinkles to keep this allergy-friendly.
- Peanut Butter Swirl: Mix in some peanut butter with the melted marshmallows for a rich, nutty twist.
- Gluten-Free: Use gluten-free crispy rice cereal to ensure everyone can indulge safely.
- Sprinkles and Edible Glitter: Brighten the eggs with colorful sprinkles or shimmer powder for visual wow-factor.

How to Make Easter Rice Krispies Eggs
Step 1: Melt Butter and Marshmallows
Begin by melting your butter in a large saucepan over low heat. Once melted, add the marshmallows and stir continuously until completely smooth and gooey. Remove from heat and stir in vanilla extract for that subtle flavor boost.
Step 2: Add Food Coloring
Divide the marshmallow mixture evenly if you’d like multiple colors. Add a few drops of your chosen food coloring(s) to the melted mixture and stir well until fully incorporated. This step lets you create pastel shades perfect for Easter eggs.
Step 3: Mix in Rice Krispies Cereal
Gently fold in the Rice Krispies cereal with a spatula, ensuring every piece is coated but trying not to crush the cereal. This keeps the eggs light and crunchy while holding their shape together.
Step 4: Shape the Eggs
Lightly grease your hands with butter or cooking spray and scoop a handful of the mixture. Quickly press and mold it into an egg shape. Place the shaped eggs on wax or parchment paper to set. Repeat with the remaining mixture.
Step 5: Decorate and Serve
Once the eggs have cooled and set, add any decorations such as sprinkles, drizzled chocolate, or edible glitter. Your Easter Rice Krispies Eggs are ready to delight! Serve immediately or store for later enjoyment.
Pro Tips for Making Easter Rice Krispies Eggs
- Use Fresh Marshmallows: Fresh marshmallows melt more smoothly and give better texture than old or stale ones.
- Butter Your Hands: Keep butter on your hands to prevent the sticky mixture from sticking during shaping.
- Don’t Overmix: Gently fold the cereal to maintain that iconic crunch and avoid sogginess.
- Work Quickly: The mixture hardens as it cools, so shape your eggs promptly for easier molding.
- Try Silicone Molds: For perfectly shaped eggs every time, silicone molds work wonders and save time.
How to Serve Easter Rice Krispies Eggs
Garnishes
Garnish your Easter Rice Krispies Eggs with pastel-colored sprinkles, mini chocolate chips, or a light dusting of powdered sugar to add an extra touch of festivity and sweetness.
Side Dishes
Pair the eggs with fresh fruit platters, yogurt dips, or creamy nut butters for a delightful combination that balances sweetness with refreshing or savory bites.
Creative Ways to Present
Arrange your eggs in colorful Easter baskets lined with shredded paper or in clear cellophane bags tied with ribbon for a charming presentation perfect for gifting or party tables.
Make Ahead and Storage
Storing Leftovers
Keep your Easter Rice Krispies Eggs fresh by storing them in an airtight container at room temperature. They will stay soft and chewy for up to 3 days, perfect for enjoying over the holiday weekend.
Freezing
Freeze the shaped eggs by wrapping each one individually in plastic wrap, then placing them in a sealed freezer bag. They can be frozen for up to 1 month—just thaw at room temperature before serving.
Reheating
Because these treats are best enjoyed at room temperature, avoid microwaving. Simply let frozen eggs defrost naturally to maintain the perfect texture.
FAQs
Can I make Easter Rice Krispies Eggs without marshmallows?
Marshmallows are essential for binding the cereal, but you can substitute with homemade marshmallow fluff or a marshmallow substitute to keep the recipe similar.
How can I make these eggs less sticky?
Use butter or cooking spray on your hands when shaping, and work quickly to prevent the mixture from sticking excessively.
What can I use if I don’t have food coloring?
Natural options like beet juice for pink, spinach powder for green, or turmeric for yellow can safely add color without artificial dyes.
Is there a vegan version of Easter Rice Krispies Eggs?
Yes! Use vegan butter and marshmallows, and make sure to choose a vegan-certified crispy rice cereal to make a plant-based alternative.
Can I add flavors like chocolate or peanut butter?
Absolutely! Stir melted chocolate or peanut butter into the marshmallow mixture before adding cereal for delicious variations on the classic recipe.
Final Thoughts
These Easter Rice Krispies Eggs are a joyful and quick way to add sweetness and festivity to your celebrations. Easy to make, fun to shape, and delicious in every bite, this recipe is sure to become a beloved tradition year after year. So grab your ingredients, roll up your sleeves, and bring some colorful cheer to your Easter table!
Related Posts
- Irresistible Easter Dirt Cake Dessert Ideas
- How to Make Mini Easter Carrot Cakes Fast
- How to Make Easter Swirl Cheesecake Pie
Easter Rice Krispies Eggs

Easter Rice Krispies Eggs are a quick, fun, and delicious treat perfect for celebrating spring. Combining the classic crunch and chewy texture of Rice Krispies cereal with festive pastel colors and an iconic egg shape, this recipe is ideal for last-minute parties, kid-friendly activities, and sweet gifting. Ready in under 30 minutes with minimal ingredients, these eggs offer customizable flavors and decorations to suit any Easter celebration.
- Prep Time: 10 minutes
- Cook Time: 10 minutes
- Total Time: 20 minutes
- Yield: 20-24 eggs 1x
- Category: Appetizers
- Method: No-Bake
- Cuisine: American
- Diet: Gluten Free
Ingredients
Main Ingredients
- 6 cups Rice Krispies Cereal
- 4 cups mini marshmallows
- 3 tablespoons unsalted butter
- 1 teaspoon vanilla extract
- Food coloring (pastel colors of your choice)
Instructions
- Step 1: Melt Butter and Marshmallows
In a large saucepan over low heat, melt the butter. Add the marshmallows and stir continuously until the mixture is completely smooth and gooey. Remove from heat and stir in vanilla extract for added flavor. - Step 2: Add Food Coloring
If using multiple colors, divide the marshmallow mixture evenly into separate bowls. Add a few drops of your chosen food coloring(s) to each bowl and stir well to create festive pastel shades. - Step 3: Mix in Rice Krispies Cereal
Gently fold the Rice Krispies cereal into the colored marshmallow mixtures using a spatula, making sure each piece is coated without crushing the cereal, to keep the eggs light and crunchy. - Step 4: Shape the Eggs
Lightly grease your hands with butter or cooking spray. Scoop a handful of the mixture and quickly press and mold it into an egg shape. Place the shaped eggs on wax or parchment paper to set. Repeat with the remaining mixture. - Step 5: Decorate and Serve
Once the eggs have cooled and set, decorate them with sprinkles, drizzled chocolate, edible glitter, or any preferred toppings. Serve immediately or store for later enjoyment.
Notes
- Use fresh marshmallows for smoother melting and better texture.
- Butter your hands to prevent stickiness while shaping the eggs.
- Gently fold in the cereal to maintain crunch and avoid sogginess.
- Work quickly as the mixture hardens as it cools, making shaping easier if done promptly.
- Silicone molds can be used for perfectly shaped eggs and to save time.
Nutrition
- Serving Size: 1 egg (approximately)
- Calories: 150 kcal
- Sugar: 12 g
- Sodium: 90 mg
- Fat: 5 g
- Saturated Fat: 3 g
- Unsaturated Fat: 1.5 g
- Trans Fat: 0 g
- Carbohydrates: 25 g
- Fiber: 0.5 g
- Protein: 1 g
- Cholesterol: 10 mg
Keywords: Easter, Rice Krispies, Rice Krispies Treats, Spring Dessert, Kid Friendly, No Bake, Gluten Free, Easter Eggs, Festive Treats