Easy Ham and Cheese Sliders for Any Occasion

If you’re looking for a quick, tasty, and irresistible crowd-pleaser, look no further than Ham and Cheese Sliders. These little sandwiches pack a punch with layers of savory ham, melted cheese, and a buttery glaze that brings everything together perfectly. Whether you’re planning a game day, a family gathering, or just a simple snack, Ham and Cheese Sliders satisfy every craving with minimal effort and maximum flavor. Let’s dive into how to make these delicious treats that everyone will be coming back for seconds of!
Why You’ll Love This Recipe
- Super Quick Prep: You can whip up a batch of Ham and Cheese Sliders in under 30 minutes, perfect for last-minute plans.
- Perfect Party Food: These sliders are easy to serve and share, making them ideal for gatherings of any size.
- Customizable Flavors: Simple ingredients let you add your own twist, from different cheeses to spices and sauces.
- Family-Friendly: Kids and adults alike enjoy this comforting, cheesy sandwich classic.
- Make-Ahead Option: You can prepare these sliders ahead of time and bake them fresh when guests arrive.
Ingredients You’ll Need
Gathering these simple ingredients is all it takes to create that perfect balance of taste and texture in Ham and Cheese Sliders. Each one plays an important role — from the soft rolls to the gooey cheese and flavorful ham.
- Slider Buns: Soft dinner rolls or Hawaiian buns work best for that tender, fluffy base.
- Ham Slices: Thinly sliced deli ham brings savory richness to every bite.
- Cheese: Swiss or cheddar cheese melts beautifully and adds a creamy texture.
- Butter: Melted butter is mixed with seasonings to create a delicious glaze over the tops.
- Dijon Mustard: A little tang for depth and added flavor punch in the butter sauce.
- Worcestershire Sauce: Adds an extra savory umami note that elevates the sliders.
- Poppy Seeds: Optional, but classic for that slight crunch and visual appeal.
Variations for Ham and Cheese Sliders
This recipe is wonderfully versatile. Feel free to adapt it based on what you have on hand or your taste preferences — making it easy to customize for different dietary needs or flavor cravings.
- Swap the Meat: Try turkey or roast beef slices instead of ham for a new twist.
- Cheese Options: Use provolone, mozzarella, or pepper jack for different textures and tastes.
- Spicy Kick: Add a sprinkle of red pepper flakes or a dash of hot sauce to the butter glaze.
- Herb-Infused: Mix fresh herbs like thyme or rosemary into the butter for a fragrant upgrade.
- Gluten-Free: Use gluten-free slider buns to accommodate dietary restrictions without missing out on deliciousness.

How to Make Ham and Cheese Sliders
Step 1: Prepare the Buns
Slice the slider buns horizontally without cutting all the way through, so they stay in one connected block. This makes it easier to assemble and serve.
Step 2: Layer the Ham and Cheese
Place a generous layer of ham evenly across the bottom half of the buns, then top with slices of your chosen cheese to cover the ham completely.
Step 3: Assemble the Sliders
Carefully place the top half of the buns over the ham and cheese layers, keeping everything aligned for neat, easy-to-serve sliders.
Step 4: Make the Butter Glaze
Combine melted butter with Dijon mustard, Worcestershire sauce, and poppy seeds in a bowl. Stir until well blended, creating a flavorful glaze.
Step 5: Apply Glaze and Bake
Brush the butter mixture over the tops of the buns thoroughly. Place the entire block of sliders on a baking sheet and bake in a preheated oven at 350°F (175°C) for about 15-20 minutes, or until the cheese is melted and the tops are golden brown.
Step 6: Serve Warm
Once baked, let the sliders cool slightly before slicing between the buns into individual sandwiches and serving immediately for the best melty, warm experience.
Pro Tips for Making Ham and Cheese Sliders
- Slice Carefully: Use a serrated knife to slice the buns evenly without crushing them.
- Butter Warm: Melt the butter first to easily mix in flavors and brush smoothly on the buns.
- Don’t Overfill: Layering too much ham or cheese can cause sliding and messy eating.
- Cover the Pan: Tent with foil if you want extra melty cheese without overly browned tops.
- Serve Promptly: Sliders taste best fresh out of the oven while the cheese is perfectly gooey.
How to Serve Ham and Cheese Sliders
Garnishes
Adding a sprinkle of fresh herbs like chopped parsley or chives on top adds a pop of color and fresh flavor to your Ham and Cheese Sliders, making them look just as good as they taste.
Side Dishes
Pair these sliders with classic sides such as crunchy pickles, a crisp green salad, or homemade potato chips for a well-rounded meal everyone will love.
Creative Ways to Present
Serve your sliders on a wooden board with toothpicks inserted for easy grabbing at parties, or arrange them in a circular pattern around a bowl of spicy mustard or ranch dip to encourage sharing.
Make Ahead and Storage
Storing Leftovers
Keep any leftover Ham and Cheese Sliders wrapped tightly in aluminum foil or an airtight container in the refrigerator for up to 3 days to maintain freshness.
Freezing
You can freeze assembled but unbaked sliders by wrapping them snugly in plastic wrap and foil. Freeze for up to 2 months, then bake directly from frozen, adding a few extra minutes to the baking time.
Reheating
For best results, reheat leftover sliders in the oven at 350°F (175°C) for about 10 minutes to revive that melty cheese and buttery top – avoid microwaving to prevent sogginess.
FAQs
Can I use different types of cheese besides Swiss?
Absolutely! Cheddar, provolone, mozzarella, or even pepper jack work wonderfully and are a great way to customize your sliders to match your flavor preferences.
What’s the best bread to use for Ham and Cheese Sliders?
Soft dinner rolls or Hawaiian buns are preferred for their light texture that complements the melty cheese and ham without overpowering the sliders.
Can I make these sliders vegetarian?
Yes! Simply substitute the ham with grilled vegetables, plant-based deli slices, or even sautéed mushrooms to maintain a delicious and satisfying slider.
Are Ham and Cheese Sliders suitable for meal prep?
Definitely. You can assemble them ahead and refrigerate overnight, then bake right before serving to have a warm, fresh meal ready without the stress.
Is there a gluten-free option for these sliders?
Yes, using gluten-free slider buns or rolls makes this recipe accessible to those with gluten intolerance without sacrificing taste.
Final Thoughts
Ham and Cheese Sliders are one of those magical recipes that bring everyone together with minimal fuss and maximum flavor. Now that you know how easy it is to make these delicious sliders, why not give them a try at your next gathering or cozy night in? They’re sure to become your go-to favorite for any occasion!
Related Posts
- How to Make a Zesty Twist on Lobster Rolls
- How to Make Jalapeno Popper Grilled Cheese
- Why Soft Cheesy Onion Bread Is So Addictive
Ham and Cheese Sliders
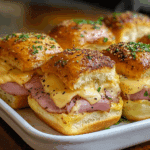
Ham and Cheese Sliders are quick, delicious mini sandwiches featuring layers of savory ham and melted cheese, topped with a buttery Dijon glaze and baked to golden perfection. Perfect for parties, game days, or family gatherings, these sliders are easy to prepare, customizable, and sure to be a crowd-pleaser.
- Prep Time: 10 minutes
- Cook Time: 15-20 minutes
- Total Time: 25-30 minutes
- Yield: 12 sliders 1x
- Category: Appetizers
- Method: Baking
- Cuisine: American
- Diet: Gluten Free (use gluten-free buns)
Ingredients
Buns and Meat
- 12 soft slider buns or Hawaiian buns
- 12 slices thinly sliced deli ham
Cheese
- 12 slices Swiss cheese or cheddar cheese
Butter Glaze
- ½ cup (1 stick) unsalted butter, melted
- 1 tablespoon Dijon mustard
- 1 teaspoon Worcestershire sauce
- 1 tablespoon poppy seeds (optional)
Instructions
- Prepare the Buns: Slice the slider buns horizontally without cutting all the way through, keeping them connected in a block for easy assembly and serving.
- Layer the Ham and Cheese: Spread a generous layer of ham evenly across the bottom half of the buns, then cover fully with slices of your chosen cheese.
- Assemble the Sliders: Place the top half of the buns carefully over the ham and cheese layers, aligning them neatly for easy cutting and serving.
- Make the Butter Glaze: In a bowl, combine melted butter, Dijon mustard, Worcestershire sauce, and poppy seeds. Stir well until fully blended.
- Apply Glaze and Bake: Brush the butter mixture thoroughly over the tops of the buns. Place the entire slider block on a baking sheet and bake at 350°F (175°C) for 15-20 minutes, until cheese is melted and tops are golden brown.
- Serve Warm: Allow sliders to cool slightly, then slice between buns into individual sandwiches and serve immediately for the best gooey, warm experience.
Notes
- Use a serrated knife to slice buns evenly without crushing them.
- Melt butter first to mix ingredients easily and brush smoothly on buns.
- Avoid overfilling with ham or cheese to prevent sliders from sliding apart.
- Optionally tent sliders with foil during baking for extra melty cheese and less browning.
- Serve sliders fresh from the oven for optimal flavor and texture.
Nutrition
- Serving Size: 1 slider
- Calories: 220
- Sugar: 1g
- Sodium: 550mg
- Fat: 12g
- Saturated Fat: 6g
- Unsaturated Fat: 4g
- Trans Fat: 0g
- Carbohydrates: 18g
- Fiber: 1g
- Protein: 10g
- Cholesterol: 35mg
Keywords: Ham and Cheese Sliders, party food, easy appetizers, game day snacks, cheesy sliders, quick recipes