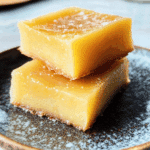
Irresistible Hawaiian Butter Mochi Recipe to Try
If you’ve ever wished you could bite into a dessert that’s both chewy and sweet with an irresistible buttery flavor, you’re going to love this Hawaiian Butter Mochi Recipe. Combining simple ingredients and a rich texture that melts in your mouth, this treat embodies the spirit of Hawaiian comfort food. Whether you’re new to making mochi or a seasoned baker looking for a delicious twist, this recipe will quickly become a favorite dessert to whip up for family and friends.
Why You’ll Love This Recipe
- Authentic Flavor Fusion: Merges the unique chewiness of mochi with a buttery, sweet taste that’s truly comforting.
- Easy to Prepare: Requires simple, staple ingredients most cooks will have on hand, making it accessible to all skill levels.
- Versatile Dessert: Perfect for parties, potlucks, or just a cozy night in with a warm batch.
- Long-lasting Freshness: Stores well so you can enjoy leftovers without losing that signature chewy texture.
- Gluten-Free Comfort: Uses rice flour making it naturally gluten-free for those with dietary restrictions.
Ingredients You’ll Need
This Hawaiian Butter Mochi Recipe relies on straightforward ingredients that together create that distinctive chewy yet tender texture and buttery richness you crave. Each item plays an essential role, from the sticky rice flour providing the base to the coconut milk adding a creamy touch.
- Sweet Rice Flour: The foundational ingredient that gives mochi its chewy texture.
- Unsalted Butter: Adds richness and a melt-in-your-mouth flavor.
- Sugar: Perfectly balances sweetness without overpowering.
- Coconut Milk: Brings a subtle tropical creaminess unique to this dessert.
- Eggs: Help bind everything together and add a light fluffiness.
- Baking Powder: Gives just the right amount of lift and airiness.
- Vanilla Extract: Enhances the overall flavor complexity.
Variations for Hawaiian Butter Mochi Recipe
This delicious Hawaiian Butter Mochi Recipe is wonderfully flexible and easy to customize. Whether you want to adapt for dietary needs or experiment with new flavors, these variations are simple tweaks that can take your dessert to the next level.
- Chocolate Butter Mochi: Add cocoa powder to the batter for a rich chocolate twist.
- Dairy-Free Version: Replace butter with coconut oil and use coconut milk to keep it vegan.
- Matcha Green Tea: Incorporate a tablespoon of matcha powder for an earthy, vibrant flavor.
- Macadamia Nut Crunch: Stir in chopped macadamia nuts for an extra Hawaiian flair and crunch.
- Sweet Potato Mochi: Mix in mashed sweet potato for added moisture and a subtle sweetness.

How to Make Hawaiian Butter Mochi Recipe
Step 1: Prepare the Ingredients
Start by preheating your oven to 350°F (175°C) and greasing your baking pan well. Measure out your sweet rice flour, sugar, eggs, melted butter, coconut milk, baking powder, and vanilla extract to have everything ready.
Step 2: Mix the Wet Ingredients
In a large bowl, whisk together the eggs, melted butter, coconut milk, and vanilla extract until combined and smooth. This blend will form the rich and creamy foundation of the batter.
Step 3: Combine Dry Ingredients
In a separate bowl, sift the sweet rice flour, sugar, and baking powder together to ensure an even distribution and prevent lumps.
Step 4: Blend Wet and Dry Mixtures
Slowly add the dry ingredients into the wet mixture, stirring gently with a spatula. Mix until the batter is smooth and free of lumps but don’t over-stir to maintain the right texture.
Step 5: Bake to Perfection
Pour the batter into your prepared pan and bake for about 50-60 minutes. You’ll know it’s done when the top is golden brown and a toothpick inserted in the center comes out mostly clean with just a few moist crumbs.
Step 6: Cool and Serve
Allow the mochi to cool completely in the pan before slicing. The cooling step helps develop its signature chewy texture, so patience here pays off!
Pro Tips for Making Hawaiian Butter Mochi Recipe
- Precise Measurements: Use a kitchen scale for rice flour to get accurate results every time.
- Room Temperature Eggs: Bring eggs to room temp before mixing to avoid lumps in the batter.
- Do Not Overmix: Stir the batter just until combined to keep the mochi tender, not dense.
- Use Fresh Coconut Milk: Full-fat coconut milk yields the best flavor and creaminess.
- Let It Rest: After baking, resting in the pan lets the mochi set perfectly for optimal chew.
How to Serve Hawaiian Butter Mochi Recipe
Garnishes
Sprinkle toasted coconut flakes, powdered sugar, or even a drizzle of chocolate on top for added flair and flavor contrast that brightens the rich butter mochi.
Side Dishes
Serve alongside fresh tropical fruits like mango, pineapple, or passion fruit for a refreshing complement that balances the chewy sweetness.
Creative Ways to Present
Cut the mochi into small squares to create bite-sized treats perfect for parties, or layer pieces with whipped cream and fruit for a delightful parfait-style dessert.
Make Ahead and Storage
Storing Leftovers
Keep leftover mochi in an airtight container at room temperature for up to three days. Refrigeration can make it firmer, so room temp is preferable to maintain chewiness.
Freezing
Wrap mochi tightly in plastic wrap and store in a freezer-safe bag. It freezes well for up to one month. Thaw at room temperature before eating.
Reheating
Reheat by microwaving mochi pieces for 20-30 seconds to soften and regain that fresh-from-the-oven warmth and texture.
FAQs
Can I use regular flour instead of sweet rice flour?
Regular flour won’t give you the chewy texture characteristic of mochi; sweet rice flour is essential for authentic results.
Is this Hawaiian Butter Mochi Recipe gluten-free?
Yes, because it uses sweet rice flour, it is naturally gluten-free, making it safe for those with gluten sensitivities.
Can I make this recipe vegan?
Yes! Substitute butter with coconut oil and use a vegan egg replacer or flax eggs with full-fat coconut milk for a plant-based version.
How long does it take to bake mochi?
This recipe typically needs 50 to 60 minutes at 350°F, depending on your oven, until the top is golden and the center is set.
Why is my butter mochi dense?
Overmixing or inaccurate measurements of rice flour often cause density; gentle folding and precise measuring can keep it light and chewy.
Final Thoughts
There’s something truly comforting and joyous about making and sharing this Hawaiian Butter Mochi Recipe. Easy to prepare yet wonderfully unique in texture and flavor, it’s a dessert that invites smiles and second helpings. Give it a try, and you might just find yourself with a new favorite dessert to brighten any occasion!
Related Posts
- Easy Copycat Little Debbie Valentine’s Day Cakes Recipe
- Irresistible Blackberry Cheesecake Brownies Recipe
- Why Jamaican Sweet Potatoes Are a Must-Try Treat
Hawaiian Butter Mochi Recipe
This Hawaiian Butter Mochi Recipe delivers a chewy, sweet dessert with an irresistible buttery flavor and tropical creaminess. Made with simple ingredients like sweet rice flour, coconut milk, and butter, it’s naturally gluten-free and easy to prepare. Perfect for family gatherings or cozy nights, this mochi offers an authentic taste of Hawaiian comfort food with a rich, melt-in-your-mouth texture.
- Prep Time: 15 minutes
- Cook Time: 50-60 minutes
- Total Time: 1 hour 10-15 minutes
- Yield: 9-12 servings 1x
- Category: Dessert
- Method: Baking
- Cuisine: Hawaiian
- Diet: Gluten Free
Ingredients
Main Ingredients
- 1 cup sweet rice flour (mochiko)
- 1 cup sugar
- 3 large eggs
- 1/2 cup unsalted butter, melted
- 1 cup full-fat coconut milk
- 1 teaspoon baking powder
- 1 teaspoon vanilla extract
Instructions
- Prepare the Ingredients: Preheat your oven to 350°F (175°C) and grease a baking pan well. Measure out the sweet rice flour, sugar, eggs, melted butter, coconut milk, baking powder, and vanilla extract to have everything ready for mixing.
- Mix the Wet Ingredients: In a large bowl, whisk together the eggs, melted butter, coconut milk, and vanilla extract until combined and smooth. This creates the rich and creamy base of the batter.
- Combine Dry Ingredients: In a separate bowl, sift the sweet rice flour, sugar, and baking powder together to ensure even distribution and prevent lumps.
- Blend Wet and Dry Mixtures: Slowly add the dry ingredients into the wet mixture, stirring gently with a spatula until the batter is smooth and lump-free. Avoid overmixing to maintain the correct texture.
- Bake to Perfection: Pour the batter into the prepared pan and bake for 50 to 60 minutes. The mochi is done when the top is golden brown and a toothpick inserted in the center comes out mostly clean with a few moist crumbs.
- Cool and Serve: Let the mochi cool completely in the pan before slicing. Cooling helps develop its signature chewy texture, so patience is key.
Notes
- Use a kitchen scale for precise measurement of rice flour to ensure consistent results.
- Bring eggs to room temperature before mixing to prevent lumps in the batter.
- Do not overmix the batter; stir just until combined to keep the mochi tender and chewy.
- Use full-fat coconut milk for the best flavor and creaminess.
- Allow the mochi to rest and cool in the pan to set perfectly for optimal chewiness.
Nutrition
- Serving Size: 1 piece (about 1/12 of recipe)
- Calories: 180
- Sugar: 20g
- Sodium: 40mg
- Fat: 7g
- Saturated Fat: 5g
- Unsaturated Fat: 2g
- Trans Fat: 0g
- Carbohydrates: 28g
- Fiber: 0g
- Protein: 2g
- Cholesterol: 55mg
Keywords: Hawaiian butter mochi, gluten free dessert, chewy mochi recipe, coconut milk mochi, sweet rice flour dessert