How to Make Krispies Easter Egg Nests Easily

If you’re looking for a fun, festive, and downright delicious treat this spring, these Krispies Easter Egg Nests are exactly what you need. Combining the nostalgic charm of crispy rice cereal with the joyful surprise of chocolate eggs tucked inside, this easy-to-make recipe delivers a sweet crunch that everyone will adore. Perfect for an Easter celebration, bake sale, or just a weekend snack, these nests are as simple to whip up as they are delightful to eat. Get ready to make a batch that’s both visually charming and irresistibly tasty!
Why You’ll Love This Recipe
- Quick and Easy: You’ll have these treats ready in under 30 minutes, making them perfect for last-minute celebrations.
- Kid-Friendly Fun: Kids love crafting their own nests and adding colorful eggs, creating a hands-on and entertaining experience.
- Customizable: You can easily swap ingredients to suit dietary preferences or what you have on hand.
- Perfectly Festive: The chocolate eggs nested in crispy rice make a visually stunning and themed Easter treat.
- Great for Gifting: These nests make lovely edible gifts or fun additions to Easter baskets.
Ingredients You’ll Need
This recipe keeps things delightfully simple, requiring only a handful of everyday pantry staples. Each ingredient works in harmony—the sweetness, the crunch, and the chocolate brings everything to life in these Krispies Easter Egg Nests.
- Crispy Rice Cereal: The key to light, crunchy nests with the perfect texture.
- Mini Marshmallows: These help bind the cereal while adding melt-in-your-mouth sweetness.
- Butter: Adds richness and helps melt the marshmallows smoothly.
- Chocolate Eggs: Classic mini candy eggs add festive color and chocolate indulgence inside each nest.
- Vanilla Extract (optional): A small splash enhances the overall flavor without overpowering.
Variations for Krispies Easter Egg Nests
Feel free to get creative with Krispies Easter Egg Nests! This recipe is wonderfully adaptable and can easily suit different tastes or dietary needs by swapping or adding a few simple ingredients.
- Nutty Twist: Add chopped toasted nuts like almonds or pecans for extra crunch and flavor.
- Chocolate Lovers’ Version: Mix in mini chocolate chips or drizzle melted chocolate over the nests.
- Gluten-Free Option: Use certified gluten-free crispy rice cereal to make it safe for gluten-sensitive eaters.
- Healthier Swap: Replace butter with coconut oil and use natural sweeteners or vegan marshmallows for a wholesome tweak.
- Colorful Fun: Fold in pastel-colored sprinkles for added festive flair and visual pop.

How to Make Krispies Easter Egg Nests
Step 1: Prepare Your Equipment
Line a baking tray or plate with parchment paper or a silicone mat. This makes it easier to shape and cool the nests without sticking.
Step 2: Melt Butter and Marshmallows
In a large saucepan over low heat, melt the butter. Once melted, add the mini marshmallows and stir continuously until completely melted and smooth. If using vanilla extract, stir it in now.
Step 3: Combine with Crispy Rice Cereal
Remove the melted marshmallow mixture from heat and fold in the crispy rice cereal, making sure every grain is coated evenly.
Step 4: Shape the Nests
While the mixture is still warm but cool enough to handle, use greased hands or a spoon to shape small rounds on your prepared tray. Gently press the center of each round to create a hollow nest shape that will hold the chocolate eggs.
Step 5: Add Chocolate Eggs
Carefully press a few chocolate mini eggs into the hollow of each nest. This step makes the nests look like tiny bird nests filled with Easter eggs, adding that festive magic.
Step 6: Let the Nests Set
Allow the nests to cool completely at room temperature or pop them in the fridge for 15-20 minutes to firm up before serving or storing.
Pro Tips for Making Krispies Easter Egg Nests
- Work Quickly: The marshmallow mixture sets fast, so have all your equipment ready before you start combining ingredients.
- Non-Stick Hands: Lightly grease your hands with butter or cooking spray to prevent sticking when shaping nests.
- Use Mini Eggs: Smaller chocolate eggs fit perfectly and keep the nests balanced and charming.
- Even Mixing: Gently fold cereal in to prevent crushing, keeping those crispy textures intact.
- Cool Thoroughly: Give the nests enough time to set properly to avoid them falling apart when handled.
How to Serve Krispies Easter Egg Nests
Garnishes
Sprinkle a pinch of colorful edible glitter or pastel sprinkles on top to add sparkle and extra festivity. Fresh mint leaves or edible flowers can also make a beautiful natural garnish alongside the nests.
Side Dishes
Pair these sweet nests with a light fruit salad or a refreshing spring punch to balance the richness. They also go wonderfully with a scoop of smooth vanilla ice cream for a delightful dessert plate.
Creative Ways to Present
Serve the nests in mini cupcake liners for easy handling or arrange them in a decorative basket lined with shredded paper resembling straw for the full Easter nest effect. You can also stack nests on a tiered tray for a stunning centerpiece at your holiday table.
Make Ahead and Storage
Storing Leftovers
Store any leftover Krispies Easter Egg Nests in an airtight container at room temperature for up to 3 days. Keep them away from humidity to maintain their crisp texture.
Freezing
For longer storage, wrap each nest individually in plastic wrap and place them in a freezer-safe bag. Freeze for up to 1 month. Thaw at room temperature before enjoying.
Reheating
These treats are best eaten as is and don’t require reheating. If softened, allow them to sit out a bit to regain their crispiness or gently crisp them in a low oven for a few minutes if needed.
FAQs
Can I use regular marshmallows instead of mini marshmallows?
Yes, you can use regular marshmallows; just chop them into smaller pieces to ensure they melt evenly and quickly.
What if I don’t have chocolate mini eggs?
Feel free to substitute with small jelly beans, chocolate chips, or even colorful candies that fit inside the nests.
Are Krispies Easter Egg Nests gluten-free?
They can be gluten-free if you use certified gluten-free crispy rice cereal — always check your ingredient labels to be sure.
Can I make these vegan?
Absolutely! Use vegan marshmallows, dairy-free butter or coconut oil, and ensure your chocolate eggs are vegan-friendly.
How long do these nests keep their freshness?
Stored properly in an airtight container, these nests stay fresh and crispy for about 3 days at room temperature.
Final Thoughts
These Krispies Easter Egg Nests are truly a joy to make and even more fun to share. Their sweet, crispy texture combined with the surprise of chocolate eggs creates an irresistible treat that brightens any Easter celebration. Whether you’re making them with kids or gifting them to loved ones, this recipe is a sure way to deliver smiles and festive spirit. Dive in and enjoy every crunchy, chocolaty bite!
Related Posts
- Why Hidden Rainbow Cookies Are Irresistible Treats
- How to Make Protein Yogurt Pudding Fast
- Easy No-Bake Cheesecake Jars for Summer
Krispies Easter Egg Nests
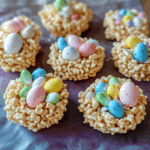
These Krispies Easter Egg Nests are a quick, easy, and festive treat combining crispy rice cereal, melted marshmallows, and mini chocolate eggs. Perfect for Easter celebrations, bake sales, or a fun snack, they offer a delightful crunch and chocolate surprise that’s both kid-friendly and customizable.
- Prep Time: 10 minutes
- Cook Time: 10 minutes
- Total Time: 20 minutes
- Yield: 24 nests 1x
- Category: Appetizers
- Method: No-Bake
- Diet: Gluten Free
Ingredients
Base Ingredients
- 4 cups Crispy Rice Cereal
- 3 tablespoons Butter
- 4 cups Mini Marshmallows
- 1 teaspoon Vanilla Extract (optional)
Decorations
- Chocolate Mini Eggs (about 24)
Instructions
- Prepare Your Equipment: Line a baking tray or plate with parchment paper or a silicone mat to prevent sticking and make shaping nests easier.
- Melt Butter and Marshmallows: In a large saucepan over low heat, melt the butter. Add the mini marshmallows and stir continuously until completely melted and smooth. Stir in vanilla extract if using.
- Combine with Crispy Rice Cereal: Remove the mixture from heat and fold in the crispy rice cereal, ensuring each grain is evenly coated without crushing the cereal.
- Shape the Nests: While warm but cool enough to handle, grease your hands lightly and shape small rounds on the prepared tray. Press the centers gently to form hollow nest shapes to hold the chocolate eggs.
- Add Chocolate Eggs: Carefully press a few chocolate mini eggs into the center hollow of each nest to create a charming Easter presentation.
- Let the Nests Set: Allow the nests to cool completely at room temperature or refrigerate for 15-20 minutes until firm before serving or storing.
Notes
- Work quickly as the marshmallow mixture sets fast.
- Grease hands with butter or cooking spray to prevent sticking while shaping.
- Use mini eggs for perfect fit and balanced nests.
- Fold in the cereal gently to keep the crispy texture intact.
- Let nests cool thoroughly to prevent them from falling apart.
Nutrition
- Serving Size: 1 nest
- Calories: 120
- Sugar: 12g
- Sodium: 90mg
- Fat: 4g
- Saturated Fat: 2.5g
- Unsaturated Fat: 1g
- Trans Fat: 0g
- Carbohydrates: 20g
- Fiber: 0.5g
- Protein: 1g
- Cholesterol: 10mg
Keywords: Easter, Krispies, Rice Cereal, Marshmallow Treats, Chocolate Eggs, Kid-Friendly, Gluten-Free