Best Mini Tarts with Lemon Curd to Try Now
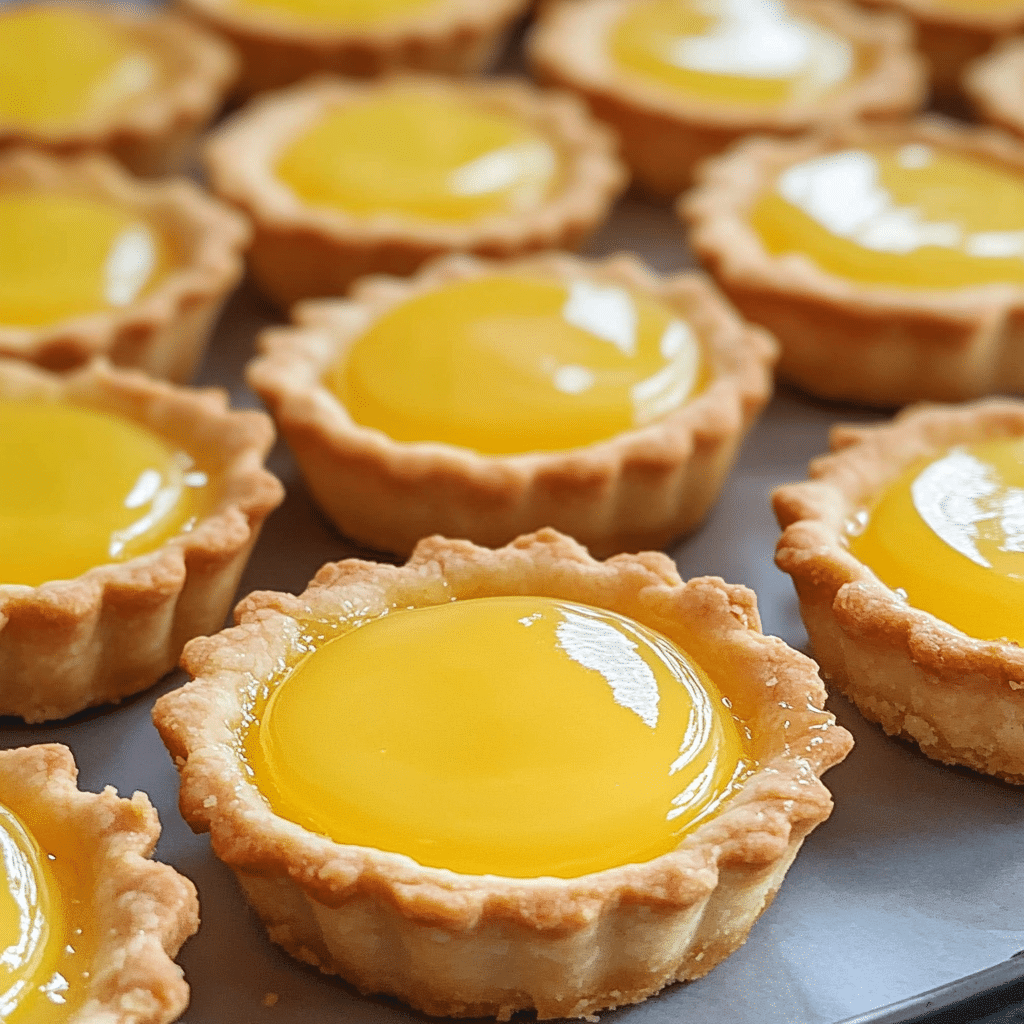
If you’re looking for a delightful dessert that’s both elegant and bursting with fresh citrus flavor, these Mini Tarts with Lemon Curd are an absolute must-try. Each bite of the crisp, buttery crust paired with the smooth, tangy lemon curd creates the perfect balance of sweet and tart. Whether you’re entertaining guests or simply craving a refreshing treat, these mini tarts are quick to make and sure to impress.
Why You’ll Love This Recipe
- Bright citrus flavor: The lemon curd delivers a zesty, refreshing punch that wakes up your taste buds instantly.
- Perfect bite-sized treats: Mini tarts offer just the right portion, ideal for parties or indulging without guilt.
- Simple ingredients: The recipe uses easy-to-find pantry staples that come together quickly.
- Versatile dessert: Great for any season or occasion—from summer picnics to cozy winter gatherings.
- Impressively elegant: Looks fancy yet requires minimal baking skills, making you feel like a dessert pro.
Ingredients You’ll Need
This recipe combines simple, essential ingredients to build a flavor-packed yet balanced dessert. Each ingredient plays a key role in contributing to the crispness of the crust or the velvet smoothness of the lemon curd, bringing the mini tarts to life.
- All-purpose flour: Forms the sturdy, flaky base of the tart crust.
- Unsalted butter: Adds richness and a tender texture to the pastry.
- Granulated sugar: Sweetens the crust just enough without overpowering the lemon filling.
- Egg yolk: Binds the dough and adds a nice golden color.
- Lemon juice and zest: Provides that fresh, tart flavor essential for authentic lemon curd.
- Sugar (for curd): Balances the sharpness of lemon with sweetness.
- Eggs (for curd): Creates the velvety, custardy texture of the lemon filling.
- Butter (for curd): Adds smoothness and richness to the curd.
Variations for Mini Tarts with Lemon Curd
One of the joys of making Mini Tarts with Lemon Curd is how easy it is to personalize them. Whether you want to adjust for dietary needs or experiment with flavor twists, these variations offer exciting alternatives.
- Gluten-free crust: Swap all-purpose flour for almond flour or a gluten-free blend to make it allergy-friendly.
- Vegan lemon curd: Use coconut milk, cornstarch, and coconut oil instead of eggs and butter for a dairy-free version.
- Mixed berry topping: Add fresh raspberries, blueberries, or blackberries on top to complement the lemon flavor.
- Coconut crust: Incorporate shredded coconut into the crust for a tropical twist.
- Lime or orange curd: Substitute lemon with lime or orange juice for a different citrus profile.

How to Make Mini Tarts with Lemon Curd
Step 1: Prepare the tart dough
Start by whisking the flour and sugar together in a large bowl. Cut in cold, unsalted butter until the mixture resembles coarse crumbs. Add the egg yolk and mix until the dough just comes together. Wrap in plastic wrap and chill for at least 30 minutes to firm up.
Step 2: Make the lemon curd
In a saucepan, whisk together lemon juice, zest, sugar, and eggs over low heat. Stir continuously until the curd thickens and coats the back of a spoon. Remove from heat and whisk in butter until smooth. Pour into a bowl and cover with plastic wrap touching the surface to prevent skin formation. Chill until set.
Step 3: Roll and shape the tart shells
Preheat your oven to 350°F (175°C). Roll out the chilled dough on a lightly floured surface to about 1/8 inch thick. Cut circles slightly larger than your mini tart pans or muffin tins. Gently press the dough into the pans and trim excess. Prick bases with a fork to prevent puffing.
Step 4: Blind bake the tart shells
Line the tart shells with parchment paper and fill with pie weights or dried beans. Bake for 12-15 minutes until edges are golden. Remove weights and parchment, then bake an additional 5 minutes to fully cook the base. Let cool completely.
Step 5: Fill and chill
Once cool, spoon or pipe the chilled lemon curd into each tart shell. Smooth the top if needed. Chill the filled tarts for at least 1 hour to allow the curd to firm up nicely before serving.
Pro Tips for Making Mini Tarts with Lemon Curd
- Use cold butter: Keeps the dough flaky rather than greasy or tough.
- Don’t over-mix dough: Stir just until combined to avoid a dense crust.
- Chill tart shells thoroughly: Prevents shrinkage during baking.
- Double strain lemon curd: For an extra smooth and silky texture.
- Store curd separately: If making ahead, keep the lemon curd in the fridge until filling the tarts.
How to Serve Mini Tarts with Lemon Curd
Garnishes
Top your mini tarts with fresh mint leaves, edible flowers, or a light dusting of powdered sugar to add visual appeal and a subtle fresh note.
Side Dishes
Serve alongside a cup of Earl Grey tea, sparkling lemonade, or a crisp glass of chilled white wine to elevate the flavor experience.
Creative Ways to Present
Arrange mini tarts on a tiered dessert stand for parties or place them in colorful cupcake liners for an extra pop of fun and color.
Make Ahead and Storage
Storing Leftovers
Store uneaten mini tarts in an airtight container in the refrigerator for up to 3 days to keep the crust crisp and the lemon curd fresh.
Freezing
You can freeze the baked tart shells separately for up to one month; just thaw before filling with fresh lemon curd. Avoid freezing tarts once filled to maintain texture.
Reheating
Reheat tart shells briefly in a warm oven at 300°F (150°C) if needed to restore crispness, but avoid heating filled tarts to prevent curd separation.
FAQs
Can I make the lemon curd ahead of time?
Absolutely! Lemon curd can be made several days in advance and stored in the refrigerator until you’re ready to fill your mini tarts.
What can I substitute for fresh lemons?
Fresh lemon juice is best for flavor, but in a pinch, bottled lemon juice can work. Just avoid artificial flavorings for the best taste.
Is there a gluten-free option?
Yes, you can use gluten-free flour blends to make the tart crust suitable for those avoiding gluten.
Can I make mini tarts with other fillings?
Definitely! These tart shells are very versatile and can be filled with chocolate ganache, fruit jams, or cream cheese frosting as well.
How do I keep the crust from getting soggy?
Blind baking the crust fully and filling the tarts just before serving helps keep the crust crisp and avoids sogginess.
Final Thoughts
Mini Tarts with Lemon Curd are the perfect blend of tangy, sweet, and buttery goodness that brighten any dessert table. Their simplicity and elegance make them a personal favorite that’s easy to share and enjoy. So go ahead, whip up a batch and treat yourself and your loved ones to these citrusy little delights—you won’t regret it!
Related Posts
- Why Homemade Peach Ice Cream Is Irresistible
- Why Baby Lemon Impossible Pies Delight Everyone
- Why Raspberry Lemon Tart Bars Are Perfect Snacks
Mini Tarts with Lemon Curd

Mini Tarts with Lemon Curd are elegant, bite-sized desserts featuring a crisp, buttery crust filled with smooth, tangy lemon curd. Perfect for any occasion, these tarts provide a refreshing balance of sweet and tart citrus flavor with simple, pantry-friendly ingredients and minimal baking skills required.
- Prep Time: 40 mins
- Cook Time: 20 mins
- Total Time: 1 hr
- Yield: 12 mini tarts 1x
- Category: Desserts
- Method: Baking
- Cuisine: American
- Diet: Gluten Free (with substitution)
Ingredients
Tart Crust
- 1 ¼ cups all-purpose flour
- ½ cup unsalted butter, cold and cubed
- ¼ cup granulated sugar
- 1 large egg yolk
Lemon Curd
- ½ cup fresh lemon juice
- 1 tsp lemon zest
- ¾ cup granulated sugar
- 2 large eggs
- 4 tbsp unsalted butter
Instructions
- Prepare the tart dough: Whisk the flour and sugar together in a large bowl. Cut in cold, unsalted butter until the mixture resembles coarse crumbs. Add the egg yolk and mix until the dough just comes together. Wrap in plastic wrap and chill for at least 30 minutes to firm up.
- Make the lemon curd: In a saucepan, whisk together lemon juice, zest, sugar, and eggs over low heat. Stir continuously until the curd thickens and coats the back of a spoon. Remove from heat and whisk in butter until smooth. Pour into a bowl and cover with plastic wrap touching the surface to prevent skin formation. Chill until set.
- Roll and shape the tart shells: Preheat your oven to 350°F (175°C). Roll out the chilled dough on a lightly floured surface to about 1/8 inch thick. Cut circles slightly larger than your mini tart pans or muffin tins. Gently press the dough into the pans and trim excess. Prick bases with a fork to prevent puffing.
- Blind bake the tart shells: Line the tart shells with parchment paper and fill with pie weights or dried beans. Bake for 12-15 minutes until edges are golden. Remove weights and parchment, then bake an additional 5 minutes to fully cook the base. Let cool completely.
- Fill and chill: Once cool, spoon or pipe the chilled lemon curd into each tart shell. Smooth the top if needed. Chill the filled tarts for at least 1 hour to allow the curd to firm up nicely before serving.
Notes
- Use cold butter to keep the dough flaky rather than greasy or tough.
- Don’t over-mix dough; stir just until combined to avoid a dense crust.
- Chill tart shells thoroughly to prevent shrinkage during baking.
- Double strain lemon curd for an extra smooth and silky texture.
- Store curd separately if making ahead; keep in the fridge until filling the tarts.
Nutrition
- Serving Size: 1 mini tart
- Calories: 180
- Sugar: 15g
- Sodium: 50mg
- Fat: 11g
- Saturated Fat: 7g
- Unsaturated Fat: 3g
- Trans Fat: 0g
- Carbohydrates: 18g
- Fiber: 0.5g
- Protein: 2g
- Cholesterol: 75mg
Keywords: Mini tarts, Lemon curd, Citrus dessert, Bite-sized dessert, Easy baking, Party dessert, Tart recipe