Easy No-Bake Cheesecake Jars for Summer

Discover delicious and creamy No-Bake Cheesecake Jars perfect for summer—quick, easy, and refreshing treats everyone will love! These delightful jars combine a smooth, velvety cheesecake filling with a crunchy base and fresh toppings, making them an irresistible dessert for warm days and casual gatherings. Whether you’re a busy home cook or hosting a fun party, these no-bake jars deliver elegance and flavor without the fuss of an oven.
Why You’ll Love This Recipe
- No oven needed: This recipe is entirely no-bake, making it ideal for hot summer days when you want to keep the kitchen cool.
- Perfect portion size: The jars serve as individual servings, making them both convenient and visually appealing.
- Customizable flavors: Easily adapt the recipe with different crusts, fillings, and toppings to suit your taste buds.
- Quick to prepare: From start to finish, these cheesecake jars come together in under 30 minutes.
- Refreshingly light: The creamy texture paired with fruity toppings creates a perfectly balanced dessert that isn’t overly heavy.
Ingredients You’ll Need
The ingredients for No-Bake Cheesecake Jars are simple but powerful, each bringing its own magic to the final dessert. From the buttery base to the creamy filling and vibrant toppings, every component plays a role in texture, flavor, and appearance.
- Crushed graham crackers: The buttery crumbs form the crunchy crust and give a satisfying bite to the jars.
- Butter, melted: Helps bind the crust together while adding richness and flavor.
- Cream cheese, softened: The star of the filling with a smooth, tangy character that defines cheesecake.
- Heavy cream or whipping cream: Whipped into soft peaks, it lightens the filling, creating a fluffy, creamy consistency.
- Powdered sugar: Sweetens the filling without any graininess, ensuring smoothness.
- Vanilla extract: Adds a warm, aromatic depth that enhances the cheesecake flavor.
- Fresh berries or fruit compote: Bright, juicy toppings that add freshness and color to each jar.
Variations for No-Bake Cheesecake Jars
Feel free to switch up the ingredients to match your preferences or dietary needs. The recipe is wonderfully versatile and lends itself to a variety of fun twists and flavors.
- Chocolate crust: Swap graham crackers for crushed chocolate cookies for a rich, decadent base.
- Fruit puree filling: Blend fresh fruits into the cheesecake batter for a fruity twist and vibrant color.
- Vegan version: Use dairy-free cream cheese and coconut cream to create a plant-based cheesecake.
- Nut crust: Replace crackers with finely ground nuts like almonds or pecans for a crunchy, gluten-free option.
- Topping combos: Add nuts, chocolate chips, or a drizzle of honey to elevate the finishing touch.

How to Make No-Bake Cheesecake Jars
Step 1: Prepare the Crust
Start by crushing your graham crackers or chosen base until fine crumbs form. Mix the crumbs with melted butter until the mixture holds together when pressed. Spoon the crust evenly into the bottoms of clean jars, pressing down gently to create a firm layer.
Step 2: Make the Cheesecake Filling
In a mixing bowl, beat softened cream cheese until smooth and fluffy. Gradually add powdered sugar and vanilla extract, blending well. In a separate bowl, whip the heavy cream until soft peaks form, then gently fold it into the cream cheese mixture to create a light, airy filling.
Step 3: Assemble the Jars
Using a spoon or piping bag, layer the cheesecake filling over the crust in each jar. Smooth the top and refrigerate for at least 2 hours to allow the filling to set and flavors to meld.
Step 4: Add Toppings
Just before serving, add your choice of fresh berries, fruit compote, or other toppings for a burst of color and refreshing taste.
Pro Tips for Making No-Bake Cheesecake Jars
- Chill all ingredients: Keep cream cheese and heavy cream cold for better texture and easier whipping.
- Don’t overmix: When folding the cream into the cream cheese, fold gently to preserve fluffiness.
- Use clear jars: Show off the layers by using transparent jars or glasses for a pretty presentation.
- Press crust firmly: This stops the crust from falling apart when eating.
- Let it rest: Refrigerate long enough for the flavors to fully develop and the filling to firm up perfectly.
How to Serve No-Bake Cheesecake Jars
Garnishes
Fresh berries like blueberries, raspberries, or sliced strawberries make perfect natural garnishes. Add a sprig of mint or a light dusting of powdered sugar for a final touch of elegance and freshness.
Side Dishes
Pair these cheesecake jars with a crisp summer salad or a light sorbet to balance the richness, turning your dessert into part of a delightful summer meal.
Creative Ways to Present
Layer in mason jars or mini mason jars for a rustic vibe, or serve in small wine glasses for a sophisticated twist. Tie each jar with a colorful ribbon for party favors or gifts that feel personal and festive.
Make Ahead and Storage
Storing Leftovers
Keep leftover No-Bake Cheesecake Jars covered and refrigerated. They stay fresh for up to 3 days, making them great for advance preparation or enjoying as a treat later in the week.
Freezing
You can freeze these jars, but know that the texture might change slightly. To freeze, cover them tightly and consume within one month, thawing overnight in the fridge before serving.
Reheating
Since these are no-bake desserts meant to be enjoyed chilled, reheating is not recommended. Simply serve them straight from the fridge for the best texture and flavor experience.
FAQs
Can I use flavored cream cheese for a twist?
Absolutely! Flavored cream cheeses like strawberry or blueberry can add fun variations and enhance the overall taste of your cheesecake jars.
Is it possible to make these dairy-free?
Yes, substituting with vegan cream cheese and coconut or almond-based cream works well to create a delicious dairy-free version.
How long do No-Bake Cheesecake Jars last unrefrigerated?
It’s best to keep them refrigerated at all times, as the cream cheese filling can spoil quickly at room temperature.
Can I prepare these jars the day before a party?
Definitely! In fact, making them a day ahead allows the flavors to meld beautifully and saves you time during your event.
What other toppings work well on No-Bake Cheesecake Jars?
Chopped nuts, caramel drizzle, chocolate shavings, or even cookie crumbs add wonderful texture and flavor contrasts.
Final Thoughts
If you’re searching for a summer dessert that’s easy, elegant, and endlessly customizable, these No-Bake Cheesecake Jars are your new best friend. They bring creamy indulgence without the hassle of baking, and their charming jars make every serving feel special. So grab your ingredients and get ready to impress family and friends with these delightful summer treats!
Related Posts
- Why Homemade Peach Ice Cream Is Irresistible
- Why Baby Lemon Impossible Pies Delight Everyone
- Why Raspberry Lemon Tart Bars Are Perfect Snacks
No-Bake Cheesecake Jars
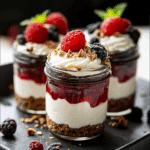
No-Bake Cheesecake Jars are creamy, refreshing, and perfect for warm summer days. These individual servings combine a crunchy buttery crust with a light and fluffy cream cheese filling, topped with fresh berries or fruit compote. Quick, easy, and customizable, these no-bake jars deliver elegant flavor without using an oven, ideal for casual gatherings or busy home cooks.
- Prep Time: 15 minutes
- Cook Time: 0 minutes
- Total Time: 2 hours 15 minutes
- Yield: 6 servings 1x
- Category: Dessert
- Method: No-Bake
- Cuisine: American
- Diet: Gluten Free (if using nut crust or gluten-free crackers)
Ingredients
Crust
- 1 1/2 cups crushed graham crackers (or chocolate cookies/nuts for variations)
- 6 tablespoons butter, melted
Filling
- 16 oz (450g) cream cheese, softened
- 1 cup heavy cream (or whipping cream)
- 3/4 cup powdered sugar
- 1 teaspoon vanilla extract
Toppings
- 1 cup fresh berries or fruit compote
- Optional: nuts, chocolate chips, honey drizzle, mint leaves for garnish
Instructions
- Prepare the Crust: Crush graham crackers or your chosen base into fine crumbs. Mix the crumbs thoroughly with melted butter until the mixture binds when pressed. Spoon the crust evenly into the bottoms of clean jars, pressing down gently to form a firm, compact layer.
- Make the Cheesecake Filling: In a mixing bowl, beat the softened cream cheese until smooth and fluffy. Gradually add powdered sugar and vanilla extract, mixing until well combined. In a separate bowl, whip the heavy cream until soft peaks form. Gently fold the whipped cream into the cream cheese mixture to maintain a light, airy texture.
- Assemble the Jars: Spoon or pipe the cheesecake filling over the crust layer in each jar. Smooth the tops and refrigerate for at least 2 hours to allow the filling to set and the flavors to meld.
- Add Toppings: Just before serving, top each cheesecake jar with fresh berries, fruit compote, or your choice of additional toppings such as nuts, chocolate chips, or a drizzle of honey for extra flavor and presentation.
Notes
- Chill all ingredients before preparing to ensure better texture and easier whipping.
- Fold the whipped cream gently into the cream cheese mixture to preserve its fluffiness.
- Use clear jars or glasses to showcase the layered dessert attractively.
- Press the crust firmly to prevent it from crumbling when eating.
- Refrigerate the assembled jars long enough (at least 2 hours) for the filling to set perfectly and flavors to develop.
- Store leftovers covered in the fridge for up to 3 days.
- Freezing is possible but may alter texture; thaw overnight in the fridge before serving.
- Reheating is not recommended—serve chilled for best taste.
Nutrition
- Serving Size: 1 jar (approx. 150g)
- Calories: 350 kcal
- Sugar: 18g
- Sodium: 150mg
- Fat: 28g
- Saturated Fat: 16g
- Unsaturated Fat: 10g
- Trans Fat: 0g
- Carbohydrates: 15g
- Fiber: 1g
- Protein: 5g
- Cholesterol: 90mg
Keywords: no-bake cheesecake, cheesecake jars, summer dessert, easy dessert, no oven dessert, individual cheesecake, creamy dessert, refreshing dessert