No-Bake Cheesecake Jars
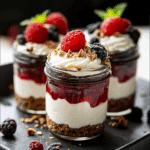
No-Bake Cheesecake Jars are creamy, refreshing, and perfect for warm summer days. These individual servings combine a crunchy buttery crust with a light and fluffy cream cheese filling, topped with fresh berries or fruit compote. Quick, easy, and customizable, these no-bake jars deliver elegant flavor without using an oven, ideal for casual gatherings or busy home cooks.
- Prep Time: 15 minutes
- Cook Time: 0 minutes
- Total Time: 2 hours 15 minutes
- Yield: 6 servings 1x
- Category: Dessert
- Method: No-Bake
- Cuisine: American
- Diet: Gluten Free (if using nut crust or gluten-free crackers)
Ingredients
Scale
Crust
- 1 1/2 cups crushed graham crackers (or chocolate cookies/nuts for variations)
- 6 tablespoons butter, melted
Filling
- 16 oz (450g) cream cheese, softened
- 1 cup heavy cream (or whipping cream)
- 3/4 cup powdered sugar
- 1 teaspoon vanilla extract
Toppings
- 1 cup fresh berries or fruit compote
- Optional: nuts, chocolate chips, honey drizzle, mint leaves for garnish
Instructions
- Prepare the Crust: Crush graham crackers or your chosen base into fine crumbs. Mix the crumbs thoroughly with melted butter until the mixture binds when pressed. Spoon the crust evenly into the bottoms of clean jars, pressing down gently to form a firm, compact layer.
- Make the Cheesecake Filling: In a mixing bowl, beat the softened cream cheese until smooth and fluffy. Gradually add powdered sugar and vanilla extract, mixing until well combined. In a separate bowl, whip the heavy cream until soft peaks form. Gently fold the whipped cream into the cream cheese mixture to maintain a light, airy texture.
- Assemble the Jars: Spoon or pipe the cheesecake filling over the crust layer in each jar. Smooth the tops and refrigerate for at least 2 hours to allow the filling to set and the flavors to meld.
- Add Toppings: Just before serving, top each cheesecake jar with fresh berries, fruit compote, or your choice of additional toppings such as nuts, chocolate chips, or a drizzle of honey for extra flavor and presentation.
Notes
- Chill all ingredients before preparing to ensure better texture and easier whipping.
- Fold the whipped cream gently into the cream cheese mixture to preserve its fluffiness.
- Use clear jars or glasses to showcase the layered dessert attractively.
- Press the crust firmly to prevent it from crumbling when eating.
- Refrigerate the assembled jars long enough (at least 2 hours) for the filling to set perfectly and flavors to develop.
- Store leftovers covered in the fridge for up to 3 days.
- Freezing is possible but may alter texture; thaw overnight in the fridge before serving.
- Reheating is not recommended—serve chilled for best taste.
Nutrition
- Serving Size: 1 jar (approx. 150g)
- Calories: 350 kcal
- Sugar: 18g
- Sodium: 150mg
- Fat: 28g
- Saturated Fat: 16g
- Unsaturated Fat: 10g
- Trans Fat: 0g
- Carbohydrates: 15g
- Fiber: 1g
- Protein: 5g
- Cholesterol: 90mg
Keywords: no-bake cheesecake, cheesecake jars, summer dessert, easy dessert, no oven dessert, individual cheesecake, creamy dessert, refreshing dessert
Find it online: https://mealsbylina.com/no-bake-cheesecake-jars/
