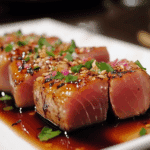
How to Make Ruth’s Chris Ahi Tuna Perfectly

If you have ever wondered how to capture the remarkable flavor and perfect texture of Ruth’s Chris Ahi Tuna right in your own kitchen, you’re in the right place. Ruth’s Chris Ahi Tuna is famous for its seared exterior paired with a tender, almost buttery interior, seasoned simply yet brilliantly. This recipe reveals the secrets to cooking this restaurant-quality favorite at home, combining fresh, vibrant ingredients and an easy-to-follow process that will impress your family and friends every time.
Why You’ll Love This Recipe
- Simple ingredients, extraordinary taste: Minimal yet flavorful elements bring out the pure essence of the ahi tuna.
- Restaurant-quality finished dish: Experience that perfectly seared crust and rare center typical of Ruth’s Chris.
- Quick and easy to prepare: This dish takes only minutes to cook, making it perfect for busy weeknights or special occasions.
- Healthy and protein-packed: Ahi tuna is rich in omega-3s, making this dish both delicious and nourishing.
- Versatile for any meal: Great as an appetizer, main course, or even a delightful salad topping.
Ingredients You’ll Need
The beauty of the Ruth’s Chris Ahi Tuna recipe lies in its simplicity. Each ingredient plays a critical role in balancing flavor, enhancing texture, or adding that alluring color that your plate deserves.
- Fresh Ahi Tuna Steaks: Choose sushi-grade tuna for the best texture and safety to achieve that signature raw center.
- High-Quality Olive Oil: The perfect searing agent that adds richness without overpowering the fish.
- Sea Salt and Freshly Ground Black Pepper: Essential seasonings that enhance the natural flavor of the tuna.
- Soy Sauce: Adds a subtle umami note and moisture to complement the tuna’s flavors gently.
- Garlic: Minced fresh garlic provides great aroma and a slight, pleasant pungency.
- Fresh Lemon Juice: Adds brightness and balances the dense flavors for a fresh finish.
- Sesame Seeds (optional): Adds a crunchy texture and an extra nutty layer that’s visually appealing.
Variations for Ruth’s Chris Ahi Tuna
Don’t be afraid to make this recipe your own! The Ruth’s Chris Ahi Tuna foundation is so versatile, it can be tweaked for different tastes, dietary needs, and available ingredients.
- Spicy Kick: Add a dusting of cayenne pepper or chili flakes for those who prefer a little heat.
- Sesame Crust: Coat the tuna steaks in sesame seeds before searing to introduce a delicious crunch.
- Gluten-Free Soy Sauce Substitute: Use tamari sauce to keep the dish gluten-free without sacrificing umami.
- Fresh Herb Twist: Incorporate chopped cilantro or basil into the marinade for a fresh herbal punch.
- Citrus Zest Infusion: Add orange or lime zest to brighten flavors and create a vibrant aroma.

How to Make Ruth’s Chris Ahi Tuna
Step 1: Preparing the Tuna
Start by patting your ahi tuna steaks dry with paper towels to ensure a perfect sear. Season both sides generously with sea salt and freshly ground black pepper. This simple seasoning sets the foundation for the classic taste you associate with Ruth’s Chris Ahi Tuna.
Step 2: Heating the Pan and Oil
Use a heavy-bottom skillet or cast iron pan and heat it over medium-high heat until it’s just about smoking. Add a tablespoon of high-quality olive oil, swirling to evenly coat the pan’s surface. The heat is crucial here to achieve that signature sear.
Step 3: Searing the Tuna
Place the tuna steaks in the hot oil, searing each side for about 1 to 1.5 minutes without moving the fish. This quick, high-heat cook is what gives you the deeply caramelized exterior while keeping the inside rare and tender.
Step 4: Adding Garlic and Soy Sauce
In the last 30 seconds of cooking, add minced garlic to the pan and carefully spoon in a splash of soy sauce. This technique infuses your tuna with savory aroma and moisture, a subtle but essential step for replicating the restaurant-quality Ruth’s Chris Ahi Tuna flavor.
Step 5: Finishing with Fresh Lemon
Remove the tuna steaks and rest them briefly on a warm plate. Squeeze fresh lemon juice on top for an added brightness that perfectly complements the rich texture of the tuna.
Pro Tips for Making Ruth’s Chris Ahi Tuna
- Use sushi-grade tuna: Always select the freshest and highest-grade tuna available for safety and best results.
- High heat is key: Preheat your pan properly to get that perfect sear and avoid overcooking.
- Don’t overcook: Aim for a rare center to maintain the delicate texture and flavor Ruth’s Chris is known for.
- Rest the tuna: Allow the fish to rest for a few minutes after cooking to retain juices and enhance flavor.
- Serve immediately: Ahi tuna is best enjoyed fresh off the pan for optimum taste and texture.
How to Serve Ruth’s Chris Ahi Tuna
Garnishes
Fresh microgreens, thinly sliced scallions, or a sprinkle of toasted sesame seeds add not only color but also a burst of flavor and texture to your plated ahi tuna.
Side Dishes
Classic companions include a light Asian-inspired cucumber salad, steamed jasmine rice, or roasted vegetables that won’t overpower the delicate flavor of the fish.
Creative Ways to Present
Serve Ruth’s Chris Ahi Tuna atop a bed of mixed greens tossed with a ginger-soy vinaigrette or thinly slice it for beautiful sashimi-style presentation paired with wasabi and pickled ginger.
Make Ahead and Storage
Storing Leftovers
If you have any leftover tuna, store it in an airtight container in the refrigerator and consume it within 24 hours to maintain freshness and texture.
Freezing
While best enjoyed fresh, you can freeze cooked ahi tuna steaks tightly wrapped in plastic wrap and foil for up to one month; however, the texture may soften upon thawing.
Reheating
Reheat gently in a low-temperature oven or briefly in a non-stick skillet to avoid overcooking your tuna and losing that signature rare center.
FAQs
What grade of tuna should I use for Ruth’s Chris Ahi Tuna?
For the best taste and safety, always use sushi-grade or sashimi-grade ahi tuna, as it is safe to eat rare and delivers the ideal texture and flavor.
Can I cook Ruth’s Chris Ahi Tuna ahead of time?
It’s best served fresh, but if necessary, you can prepare it a few hours ahead, storing it in the refrigerator and reheating gently before serving.
How rare should I cook the tuna?
Ruth’s Chris Ahi Tuna is typically seared on the outside and raw to rare in the center, so cook each side about 1 to 1.5 minutes depending on thickness.
Is it okay to marinate the tuna?
Yes, a brief marinade of soy sauce, garlic, and lemon juice enhances flavor, but avoid long marinating times to preserve the tuna’s firm texture.
What are some good alternatives if I can’t find ahi tuna?
Yellowfin tuna is a great substitute due to its similar flavor and texture; just ensure it’s sashimi-grade to keep safety standards high.
Final Thoughts
Making Ruth’s Chris Ahi Tuna at home is not only doable but incredibly rewarding. With simple, fresh ingredients and a few expert steps, you’ll create a dish as stunning and flavorful as the one you’d savor at the restaurant. Dive in, impress your guests, and enjoy every delicious bite of this elegant and wholesome meal.
Related Posts
- How to Make Vietnamese Caramel Ginger Chicken
- How to Make the Best Fiesta Chicken Bake
- How to Make Low-Carb Chicken Enchiladas Fast
Ruth’s Chris Ahi Tuna
Recreate the iconic Ruth’s Chris Ahi Tuna at home with this simple, restaurant-quality recipe. Featuring sushi-grade tuna seared to perfection, seasoned with minimal yet vibrant ingredients like garlic, soy sauce, and fresh lemon juice, this dish offers a tender, buttery interior with a flavorful crust. Quick to prepare and packed with protein and omega-3s, it’s perfect as an appetizer, main course, or salad topping.
- Prep Time: 5 minutes
- Cook Time: 4 minutes
- Total Time: 9 minutes
- Yield: 2 servings 1x
- Category: Appetizers
- Method: Searing
- Cuisine: American
- Diet: Gluten Free
Ingredients
Ingredients
- 2 Fresh sushi-grade Ahi Tuna Steaks (about 6 oz each)
- 1 tablespoon High-Quality Olive Oil
- Sea Salt, to taste
- Freshly Ground Black Pepper, to taste
- 1 teaspoon Soy Sauce
- 1 clove Garlic, minced
- 1 teaspoon Fresh Lemon Juice
- 1 teaspoon Sesame Seeds (optional)
Instructions
- Preparing the Tuna: Pat the ahi tuna steaks dry with paper towels to ensure a perfect sear. Season both sides generously with sea salt and freshly ground black pepper to build the classic flavor foundation.
- Heating the Pan and Oil: Heat a heavy-bottom skillet or cast iron pan over medium-high heat until it’s just about smoking. Add a tablespoon of high-quality olive oil and swirl to coat the pan evenly. Proper heat is essential to achieve that signature sear.
- Searing the Tuna: Place the tuna steaks in the hot oil and sear each side for 1 to 1.5 minutes without moving the fish. This quick, high heat cooking creates a deeply caramelized crust while keeping the center rare and tender.
- Adding Garlic and Soy Sauce: In the last 30 seconds of cooking, add the minced garlic to the pan and carefully spoon in a splash of soy sauce. This infuses the tuna with savory aroma and moisture, replicating the restaurant-quality flavor.
- Finishing with Fresh Lemon: Remove the tuna steaks and let them rest briefly on a warm plate. Squeeze fresh lemon juice over the top for added brightness that balances the rich texture.
Notes
- Use sushi-grade tuna for the safest and best tasting results.
- Preheat your pan properly to ensure a perfect sear.
- Do not overcook; aim for a rare center to maintain tenderness.
- Allow tuna to rest for a few minutes after cooking to retain juices.
- Serve immediately for optimal taste and texture.
Nutrition
- Serving Size: 1 tuna steak (6 oz)
- Calories: 240
- Sugar: 0g
- Sodium: 350mg
- Fat: 10g
- Saturated Fat: 1.5g
- Unsaturated Fat: 8.5g
- Trans Fat: 0g
- Carbohydrates: 1g
- Fiber: 0g
- Protein: 35g
- Cholesterol: 60mg
Keywords: Ruth's Chris Ahi Tuna, seared ahi tuna, ahi tuna recipe, restaurant-style tuna, gluten free seafood