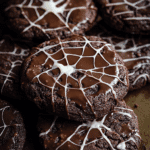
How to Make Spiderweb Chocolate Cookies Easily

If you have a sweet tooth and love cookies that are as beautiful as they are delicious, then you must try these Spiderweb Chocolate Cookies. This delightful recipe combines a rich chocolate flavor with a charming spiderweb design, making it the perfect treat for any occasion. Whether you’re baking for family, friends, or treating yourself, these Spiderweb Chocolate Cookies are both simple to make and irresistibly tasty. Follow this easy, step-by-step guide to create cookies that not only satisfy your cravings but also impress with their unique, fun look.
Why You’ll Love This Recipe
- Easy to Follow: Clear instructions make baking these Spiderweb Chocolate Cookies accessible for both beginners and seasoned bakers.
- Visually Stunning: The delicate spiderweb pattern adds a creative flair that makes these cookies stand out at any gathering.
- Rich Flavor: Deep chocolatey taste that melts in your mouth, satisfying every chocolate lover’s craving.
- Versatile Treat: Perfect for holidays, parties, or everyday indulgence with a cup of coffee or tea.
- Customizable: This recipe can be easily tweaked to fit dietary needs or personal preferences without compromising taste.
Ingredients You’ll Need
With just a handful of simple ingredients, you can whip up these Spiderweb Chocolate Cookies quickly. Each item plays a crucial role in creating that perfect balance of flavor, texture, and the stunning web-like finish.
- All-Purpose Flour: The foundation that provides structure to your cookies for a tender crumb.
- Cocoa Powder: Adds the rich chocolate flavor and helps deepen the cookie’s color.
- Butter: Gives a creamy richness and contributes to the perfect chewy texture.
- Sugar: For sweetness and slight caramelization during baking.
- Egg: Binds all ingredients together, ensuring a smooth dough.
- Baking Powder: Helps the cookies rise lightly, keeping them soft yet firm.
- Vanilla Extract: Enhances the overall flavor with a warm and aromatic touch.
- Powdered Sugar or White Icing: For drawing the crisp, contrasting spiderweb design on top.
Variations for Spiderweb Chocolate Cookies
Feel free to get creative with this recipe by exploring some easy variations. Adapting the Spiderweb Chocolate Cookies formula allows you to cater to dietary restrictions or simply switch up flavors to keep things exciting.
- Gluten-Free Version: Substitute all-purpose flour with a gluten-free blend without losing texture or taste.
- White Chocolate Spiderweb: Use white chocolate cocoa powder or add white chocolate chips for a different flavor profile.
- Nutty Crunch: Add chopped walnuts or pecans into the dough for extra crunch and flavor.
- Spicy Twist: Incorporate a pinch of cinnamon or chili powder for a subtle warmth.
- Vegan-Friendly: Replace butter with coconut oil and use flax eggs to make these cookies 100% plant-based.

How to Make Spiderweb Chocolate Cookies
Step 1: Prepare the Dough
Begin by creaming softened butter with sugar until light and fluffy. Add the egg and vanilla extract, mixing thoroughly. Sift together flour, cocoa powder, and baking powder, then gradually blend them into your wet ingredients to form a smooth, chocolatey dough.
Step 2: Shape and Chill
Roll the dough into a log shape, wrap tightly in plastic wrap, and refrigerate for at least one hour. Chilling makes the dough easier to slice and helps maintain the cookie shapes during baking.
Step 3: Slice and Arrange
Preheat your oven to 350°F (175°C). Slice the chilled dough into even rounds about 1/4 inch thick, arranging them evenly spaced on a baking sheet lined with parchment paper.
Step 4: Bake the Cookies
Bake for 10-12 minutes, until the edges are set but the centers remain soft. Don’t overbake to keep these Spiderweb Chocolate Cookies tender and chewy.
Step 5: Create the Spiderweb Design
Once the cookies have cooled slightly, use powdered sugar icing to draw concentric circles on each cookie. Then, with a toothpick or skewer, drag lines outward from the center to the edge of the circle to form an elegant spiderweb pattern.
Pro Tips for Making Spiderweb Chocolate Cookies
- Chill Properly: Don’t skip chilling the dough; it prevents spreading and helps create clean cookie shapes.
- Use Quality Cocoa: A high-quality cocoa powder elevates the chocolate flavor significantly.
- Consistent Slices: Slice dough evenly for uniform baking and consistent cookie size.
- Work Quickly on Decorating: Apply the spiderweb icing while the cookies are warm but not hot for best adherence.
- Cool Completely: Allow cookies to cool fully before packaging or storing to maintain crispness and design integrity.
How to Serve Spiderweb Chocolate Cookies
Garnishes
Add a dusting of powdered sugar or drizzle with melted white chocolate for extra elegance. Small edible silver beads can elevate the spiderweb design into something truly festive.
Side Dishes
These cookies pair beautifully with hot beverages like coffee, tea, or rich hot chocolate. For an indulgent treat, add a scoop of vanilla or mint ice cream alongside.
Creative Ways to Present
Stack the Spiderweb Chocolate Cookies in a decorative jar or arrange them on a plate with fresh berries and mint leaves. You can also package them in clear cellophane bags tied with a ribbon to gift friends or family.
Make Ahead and Storage
Storing Leftovers
Keep leftover cookies in an airtight container at room temperature for up to five days to maintain their softness and flavor.
Freezing
These Spiderweb Chocolate Cookies freeze well—store them in a sealed container or freezer bag for up to three months. Thaw at room temperature before decorating or serving.
Reheating
Warm cookies for 10-15 seconds in the microwave to revive that fresh-baked softness, but avoid overheating to preserve the spiderweb decoration.
FAQs
Can I make these cookies dairy-free?
Absolutely! Use dairy-free butter or coconut oil and ensure your chocolate and cocoa powder are dairy-free to enjoy vegan Spiderweb Chocolate Cookies.
How long does it take to make Spiderweb Chocolate Cookies?
From start to finish, you can expect about 1.5 to 2 hours, including chilling and decorating time.
Can I use store-bought icing for the spiderweb design?
Yes, store-bought royal icing or a simple powdered sugar glaze works perfectly for creating the spiderweb pattern.
Are Spiderweb Chocolate Cookies spooky enough for Halloween?
Definitely! Their spiderweb design adds a festive touch that’s perfect for Halloween parties or themed events.
Can I substitute cocoa powder for melted chocolate?
It’s best to stick with cocoa powder here since it blends easily into the dough without altering texture the way melted chocolate would.
Final Thoughts
If you’re looking to dazzle with a cookie that’s as charming as it is flavorful, these Spiderweb Chocolate Cookies are your new go-to. Easy to bake, fun to decorate, and decadently chocolatey, they’re sure to become a favorite at your kitchen table. Grab your ingredients and give these cookies a try—you might just discover a sweet new tradition!
Related Posts
- Easy Apple Coffee Cake with Cinnamon Streusel Recipe
- Easy Apple Crisp with Oats and Cinnamon Recipe
- Irresistible Sour Cream Apple Pie with Brown Sugar Streusel
Spiderweb Chocolate Cookies
These Spiderweb Chocolate Cookies combine a rich, deep chocolate flavor with a visually stunning spiderweb design. Perfectly chewy with a tender crumb, they are easy to make and impress at any occasion, from holidays and parties to everyday indulgences. Customizable for various dietary needs, these cookies are a fun and delicious treat for chocolate lovers.
- Prep Time: 20 minutes
- Cook Time: 10-12 minutes
- Total Time: 1 hour 30 minutes
- Yield: 24 cookies 1x
- Category: Dessert
- Method: Baking
- Cuisine: American
- Diet: Gluten Free (when using gluten-free flour blend)
Ingredients
Main Ingredients
- 1 ½ cups All-Purpose Flour (or gluten-free flour blend for gluten-free version)
- ½ cup Cocoa Powder
- ½ cup Butter, softened (or coconut oil for vegan version)
- ¾ cup Sugar
- 1 large Egg (or flax egg for vegan version)
- 1 teaspoon Baking Powder
- 1 teaspoon Vanilla Extract
For Decoration
- Powdered Sugar or White Icing (for drawing the spiderweb design)
Instructions
- Prepare the Dough: Begin by creaming the softened butter with sugar until light and fluffy. Add the egg and vanilla extract, mixing thoroughly. Sift together the flour, cocoa powder, and baking powder, then gradually blend them into the wet ingredients to form a smooth, chocolatey dough.
- Shape and Chill: Roll the dough into a log shape, wrap tightly in plastic wrap, and refrigerate for at least one hour. Chilling makes the dough easier to slice and helps maintain the cookie shapes during baking.
- Slice and Arrange: Preheat your oven to 350°F (175°C). Slice the chilled dough into even rounds about 1/4 inch thick. Arrange them evenly spaced on a baking sheet lined with parchment paper.
- Bake the Cookies: Bake for 10-12 minutes, until the edges are set but the centers remain soft. Avoid overbaking to keep the cookies tender and chewy.
- Create the Spiderweb Design: Once the cookies have cooled slightly, use powdered sugar icing to draw concentric circles on each cookie. Then, with a toothpick or skewer, drag lines outward from the center to the edge of the circle to form an elegant spiderweb pattern.
Notes
- Chill the dough properly to prevent spreading and ensure clean cookie shapes.
- Use high-quality cocoa powder for the best chocolate flavor.
- Slice dough evenly for uniform baking and consistent cookie sizes.
- Decorate the spiderweb icing while cookies are warm (not hot) for the best adherence.
- Allow cookies to cool completely before packaging or storing to maintain crispness and design integrity.
Nutrition
- Serving Size: 1 cookie
- Calories: 120
- Sugar: 10g
- Sodium: 50mg
- Fat: 6g
- Saturated Fat: 3.5g
- Unsaturated Fat: 2g
- Trans Fat: 0g
- Carbohydrates: 15g
- Fiber: 2g
- Protein: 2g
- Cholesterol: 25mg
Keywords: Spiderweb Chocolate Cookies, chocolate cookies, Halloween cookies, spiderweb design, easy chocolate cookies, gluten-free cookies, vegan chocolate cookies

